Sharepoint
SharepointMicrosoft SharePoint is a cloud-based service that helps organizations share and manage content, knowledge, and applications to empower teamwork, quickly find information, and seamlessly collaborate across the organization.
Accessing SharePoint
Accessing SharePointThere are a few methods of navigating to the SharePoint site. They have been listed below with steps.
 Navigate to SharePoint from the URL
From within a web browser, you will be able to access the Home page of the SharePoint site by using the URL.
For quick access, you can bookmark these URLs, or add this as a Home page to your favorite browser.
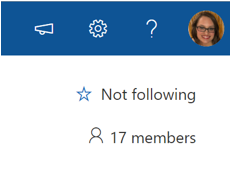
Upon first accessing your site, check the star that says “Not Following” on the right-hand side of the page below your photo and change to Following. This will ensure your site is always available in the steps below.
Navigate to SharePoint from within Office 365
To access SharePoint from within Office 365, type Office.com into your web browser. You may be prompted to login with your email and password if you are not already authenticated. Once in Office 365, select SharePoint from your app launcher (menu with 3x3 small squares in the top right of your page).  You will see a list of the sites you are following or have accessed recently in the left-hand menu. Select the site you wish to access, and you will be taken there.
Add Shortcut to OneDrive
Add Shortcut to OneDriveIf you wish to have a shortcut to your SharePoint library or a folder in your SharePoint library within your OneDrive (your personal cloud storage), select the file or folder and choose the Add Shortcut to OneDrive option from the top menu.

You will see a refresh icon running in the top left area of the menu. Once the shortcut is created, you will get a confirmation message. You can now use this shortcut.

When viewing in OneDrive, the folder will have the same icon that is next to Add shortcut to OneDrive and will be labeled appropriately. In this example I added a shortcut to the entire library, so it is displayed as Shared Documents as shown in the confirmation message. Additionally, the owner will be shown as the name of your site instead of Private.

NOTE: You cannot sync to your file explorer and Add a Shortcut to OneDrive for the same library you must select one of the two options that works best for you.
Document Alerts / Alert Me
Document Alerts / Alert MeSharePoint offers a feature for document alerts that allows you to subscribe to changes that occur at the document or folder level.
- Navigate to the folder or document you wish to monitor/receive alerts on and select the document or folder you wish to be alerted on
- In the ellipses menu or the top menu, select Alert Me.
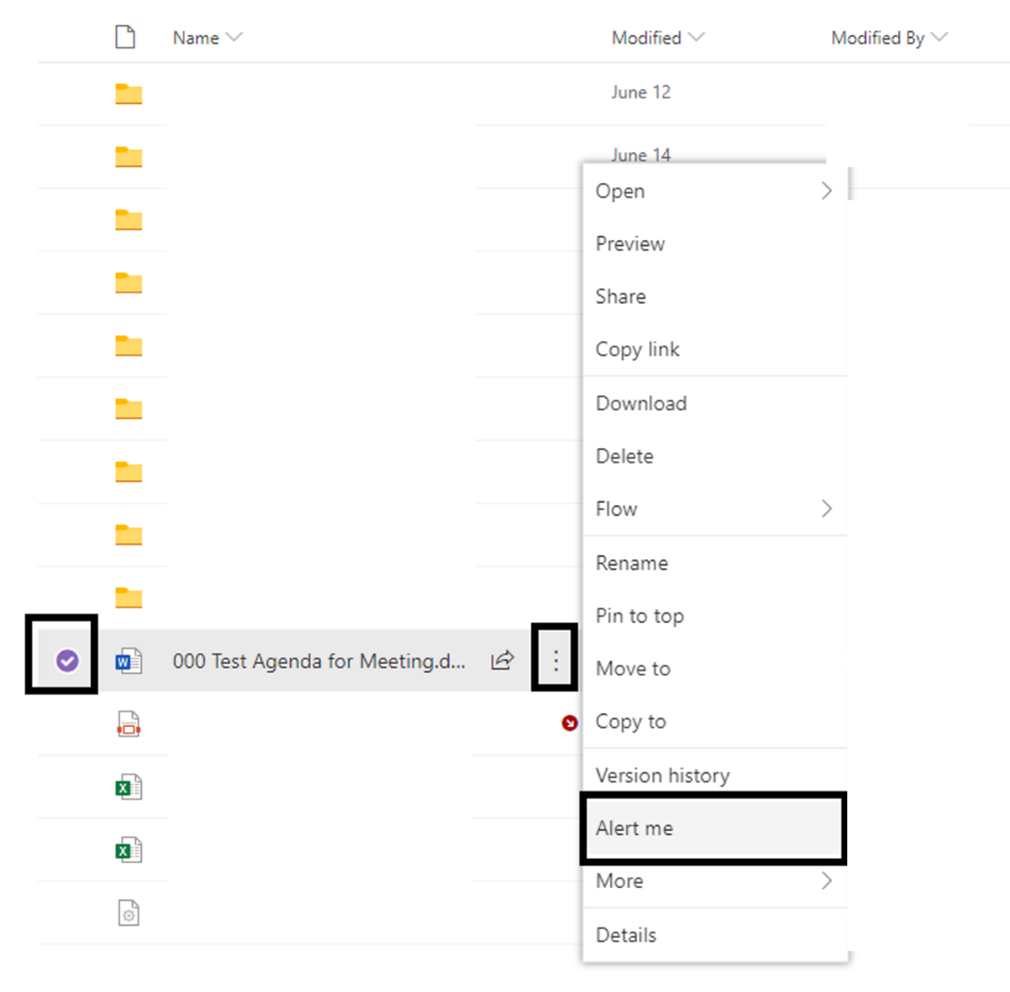
- This will pull up the settings for your alerts. Select the settings you wish to use and save. Note: If you select Send a notification immediately, you will get an email or text every time the document is saved. With autosave and online editing, this can cause a lot of emails to be sent. We suggest the Daily or Weekly summary option.
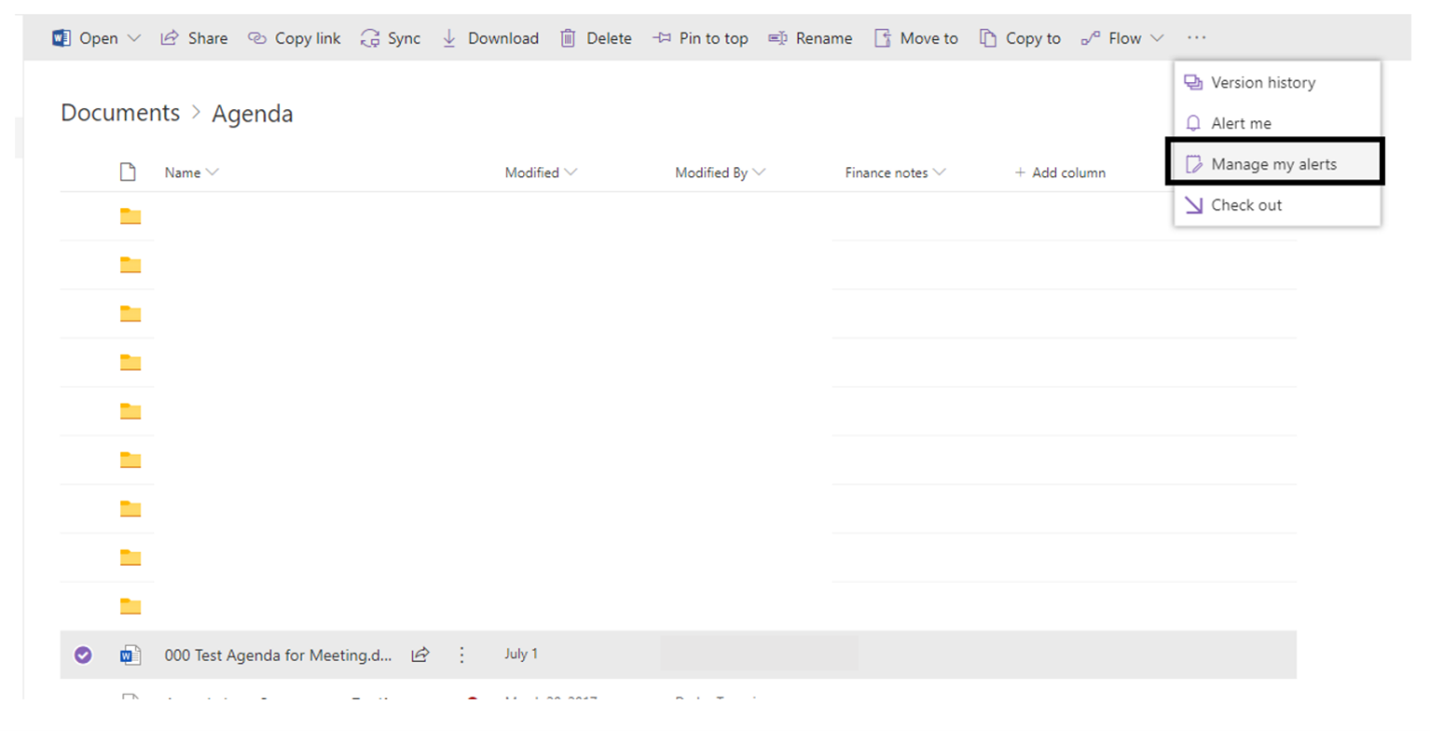
- If you wish to revise your alerts or adjust the frequency of your alerts. Follow the same process, but instead of selecting alert me, select Manage my Alerts. This will allow you to delete or revise the alerts you have set up.
Edit in Grid View
Edit in Grid ViewIf you wish to do a mass renaming of files or folders, edit in grid view will be your best friend! This feature allows you to rename files in a spreadsheet like manner for quick editing. To launch this mode, select Edit in Grid view from the top menu.
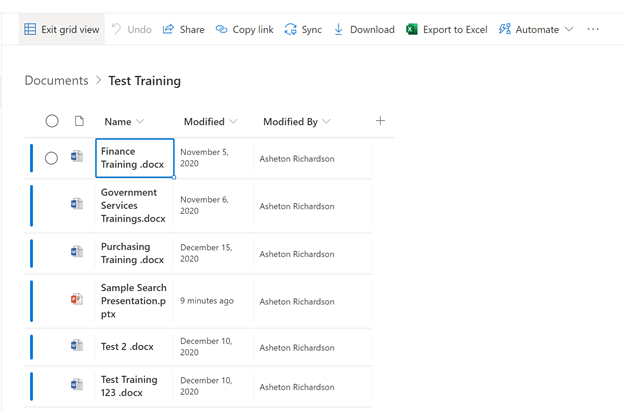
When you are done with your edits, select Exit Grid view.
Export to Excel
Export to ExcelIf you wish to see a list of documents in Excel to organize and filter, you can choose Export to Excel from the main menu. When you do this, it will launch and Excel sheet with the name of query. You may also receive a notice to enable the functionality in Excel. Once it completes, you will see a list of your files and their attributes with the file names containing a link to the document in SharePoint.

Menu Items to Ignore or Avoid
Menu Items to Ignore or AvoidYou may notice some menu items that are not listed in this training. These items are used for other Microsoft applications or for built in workflows. You can ignore the following menu items:
- PowerApps: This is used to build workflows connected to Microsoft PowerApps and are not used for basic document management.
- Automate: This is also related to workflows and is not used for basic document management.
Searching for Documents
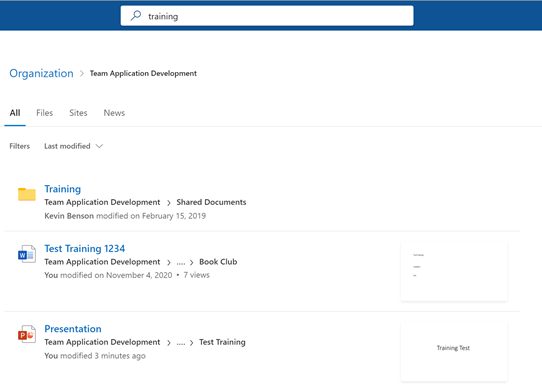
Searching for DocumentsSharePoint search is a powerful tool. SharePoint indexes folder and file names similar to a file share but it also indexes the contents within a document and allows you to search within documents and files.
To use SharePoint search, locate the search bar at the top of your page and type in the word or phrase you wish to search by. You will then be presented with search results. You can refine these results by a number of different filters such as file type, date modified, date range, newest to oldest, etc. A quick preview of the document will be shown on the right side as well.
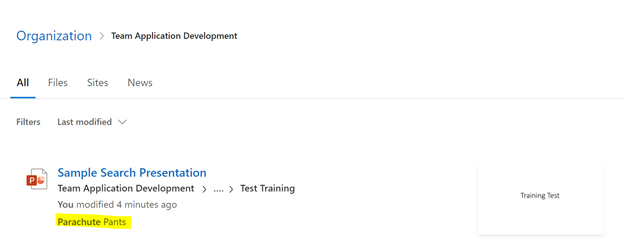
To demonstrate the power of search, I created a test PowerPoint with the words Galapagos islands and parachute pants that are only present within the file and not in the title. This is what SharePoint presented to me when I searched for parachute showing me that parachute pants are present in one of the slides. Indexing takes around 5-15 minutes to take effect but will continually index as documents are added and updated. In this example the indexing only took about 2 minutes as the file was not large.
SharePoint Sync to File Explorer
SharePoint Sync to File ExplorerRemoving a Synced library
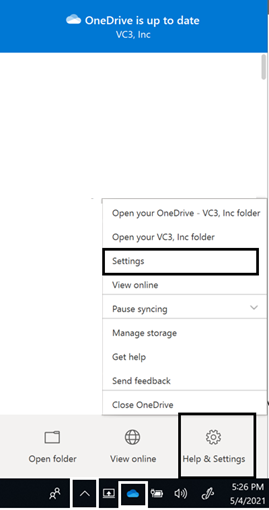
Removing a Synced libraryIf you wish to remove a synced library, you must first open the settings to OneDrive on your device. To do this, find the OneDrive icon in your toolbar near the date and time. If you do not see the OneDrive (blue cloud) icon, open up your tool tray to find it there. Once in OneDrive, select Help & Settings, then Settings.
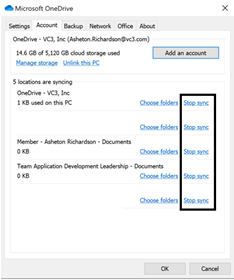
Once in your settings, you will see all the libraries you are currently syncing, to stop a sync, select stop sync on the library you wish to remove.
Once you have stopped the sync, navigate to your file explorer and find the folder you recently stopped syncing. Once the status column is empty (no blue cloud or green check mark), you are good to delete the folder from your file explorer.
IMPORTANT: Do not delete the folder until the status column is empty. If the files are still in the process of unsyncing and have not completed all the way, you will be deleting the files from your source library.
Syncing a New Library
Syncing a New LibraryIf you wish to sync your SharePoint libraries to your file explorer, you will first have to login to OneDrive on your device. To do this, find the OneDrive Icon in your tool bar (blue cloud) and login if you are not already logged in.
Best Practice
You can only sync around 100,000 files across all of your OneDrive and SharePoint libraries. It is advised to use the browser and only sync items to your file explorer that are absolutely necessary. This involves only syncing certain folders and libraries.
If you wish to sync a large library, check with your administrator before doing so in order to not experience any syncing issues or loss of data due to sync errors.
Pre-Requisites
You can only do SharePoint sync when using a personal PC or laptop. If you are running a virtual desktop or using a Citrix client – DO NOT SYNC!
If you are on a personal PC or laptop, you must be running Windows 10 OS version 1709 or greater. If you are unsure of your OS version, check with your administrator before syncing your libraries. If you are on an older version of the OS, the files will use storage on your computer to sync the files. To ensure you do not run into any sync issues, contact your administrator before syncing.
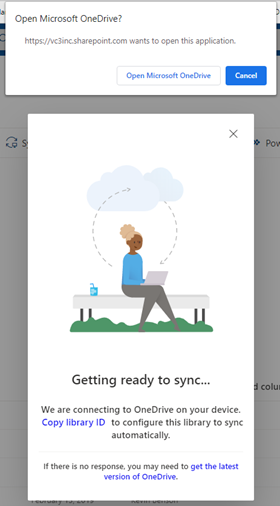
Once logged in to OneDrive, you can sync any SharePoint library to your file explorer by navigating to your Documents and hitting sync.

Once you hit sync, you will be prompted to open OneDrive for syncing to occur.
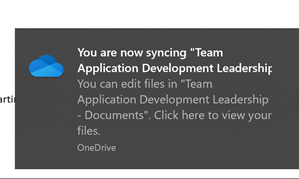 Upon successful sync, you will get a message that says you are now syncing the library.
If you had previously synced this library, OneDrive will ask if you want to use your old folder location to sync or select a new one. If you are already syncing this library, you will be provided a message saying you cannot sync because you are already syncing.
Sharing Documents
Sharing DocumentsManage Link Access
Manage Link Access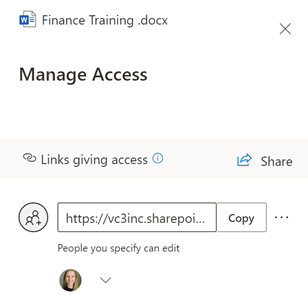
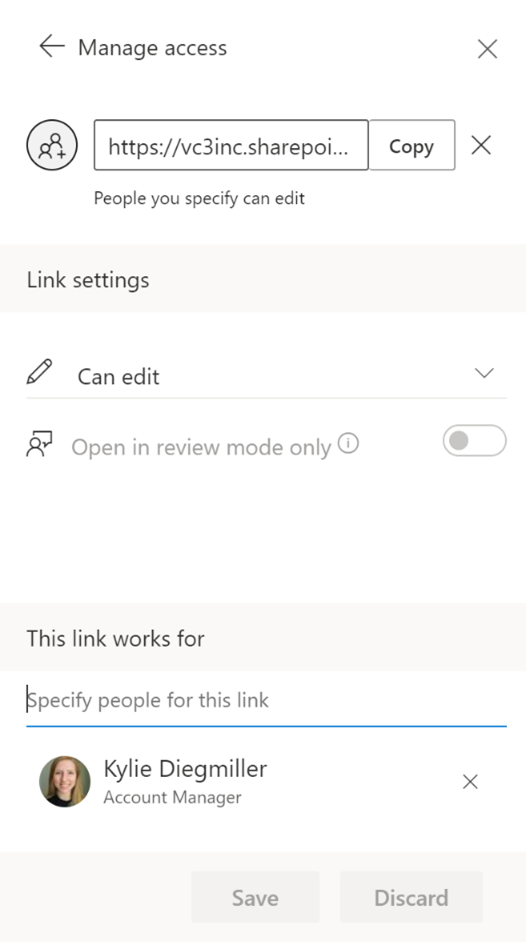
The manage access menu item will display share links that have been created for the item you have selected. Depending on your access level, you may also be able to manage permissions for the document. Most users will not have this ability and if desired, VC3 support can adjust permissions.
If you would like to remove or edit a sharing link you have provided, select manage access. This will display all the links associated with this item.
If you would like to change or remove a link, select the ellipses menu. This will allow you to adjust the link or remove it. From here you can adjust the settings for the existing link (you will not have to change the link that has been sent), or you can remove the link by selecting the X next to it.
Note: If you shared a link with the “People with existing access” option, it will not be listed here as it does not have any associated settings because the person receiving it already had access.
Share a Document Externally via Email Attachment
Share a Document Externally via Email AttachmentIf you need to share a document externally, you can do so starting in SharePoint or starting in Outlook.
From SharePoint
To share a document via Outlook as an attachment from within SharePoint, locate the document you wish to Share and open in your installed application. Once in your installed application, select Share from the menu. Once on the Sharing Menu, select the attach to Outlook option. This will open Outlook with the document attached and allow you to send via Outlook.
From Outlook
From within Outlook, you can send a file from SharePoint in the same way you would another attachment. Create a new message and select attach file, from here, you will be presented with all recent files you have interacted with including those stored in SharePoint. Select the correct file and send. This will not send a link to the file as you would internally but does allow you to share a document attachment which is a copy of the document externally.
Share a Document Internally
Share a Document InternallyWhen sharing documents internally from SharePoint, no emails are needed. You can simply send a link to the document. This is best practice because it ensures the recipient is receiving the latest version of the document and does not require any email attachments which can cause users to be looking at outdated documents.
Sending a link can be done in two ways. You can copy the link and send to the recipient via your chosen delivery method, such as IM, or send the link directly from SharePoint to the recipient via Outlook.
By default, the files in SharePoint are inheriting permissions from the library is which they are stored. This varies based on the library in which you are using. You do have the ability to change permissions on a file and allow access to users that do not currently have access using the share or you can simply send a link to someone that already has access to the document.
Sharing Dialog Options
Sharing Dialog OptionsLink Settings:
- People in <Organization> with the link:
- When sharing a link internally, if you select "People in your organization", anyone with an email address that matches your organization, @vc3.com for example, they will be able to use your link. This is helpful for documents that need to be shared with large groups or for documents that can be accessed for all users in your organization.
- People with existing access:
- This link is very important for SharePoint. This should be your default option. By selecting this option, you are simply sending a link to someone that already has access to the document without changing permissions on it.
- Specific people:
- This link is used to update access to the document for specific people. By using this option, you are saying you would like to give access to the people you name.
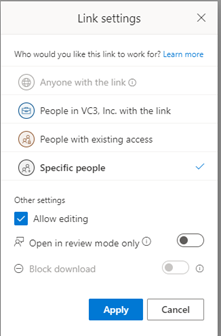 Other Settings:
Based on the link settings you choose, you will have other additional settings you can select.
- Allow Editing:
- By checking this option, the link you send will give the recipients Edit permissions to the document
- If you would like them to be able to edit, but approve their changes before they get added to the document, select the option for “Open in review mode only”
- By checking this option, the link you send will give the recipients Edit permissions to the document
- Read Only:
- Uncheck Allow Editing to make the document read only. This will only allow the recipient to view the document with the link provided.
- To go a step further, you can also block them from downloading the document by selecting Block Download.
- Uncheck Allow Editing to make the document read only. This will only allow the recipient to view the document with the link provided.
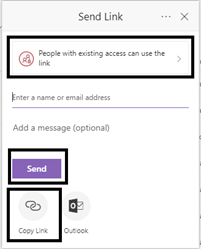
Send link via Outlook or Copy Link to clipboard
Navigate to the document you wish to invite someone to collaborate on. You can share before opening a document or after it has been opened. There are multiple options for each method, all options open the same dialog.
- Without Opening the Document:
- Select the Share icon next to the ellipses menu (square with an arrow).
- Select the ellipses on the document and then select Share.
- Select the file by checking the checkmark circle next to it, and select Share from the top menu.
- After the Document is Open:
- Select Share in the top right underneath your Account information.
- Select File > Share > Share with People.
Best Practice
When sharing document within your organization, send a link as opposed to an attachment. This will ensure the recipient will receive the latest version of the document.
 When sharing with users that already have access, ensure you select “People with Existing Access” so as to not update permissions on the document.
Send via Outlook:
Update your link settings to your specifications, then if required, add the person(s) you would like to send to and send. This will send them an email with a link to the document.
Copy to Clipboard:
Update your link settings to your specifications, then if required, add the person(s) you would like to send to and paste the link to send via another method like direct message.
Signing into SharePoint
Signing into SharePointTo use SharePoint, you must be signed into Office. For help signing into Office online and through your installed apps on any device, you can visit this Microsoft article. Instructions for using a web browser or office apps installed on a PC, see below.
 Browser
Sign in to www.office.com from a web browser and start using the apps on the web or access other web services associated with your account such as OneDrive and SharePoint.
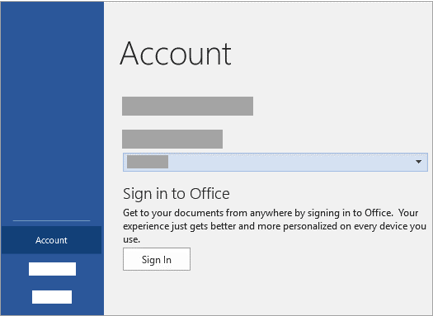
Installed Office Applications (PC)
-
If you are not already in an Office file or document, open an app such as Word or Excel, and open an existing file, or create a new one.
-
Select File > Account (or Office Account if you are using Outlook). If you are not already signed in, click Sign In.
-
In the Sign in window, type the email address or username and password you use with your work or school account.
Working with Documents
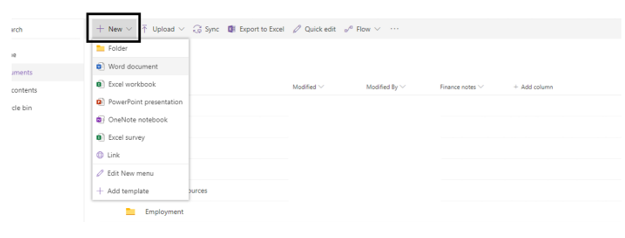
Working with DocumentsAdding a New Document
Adding a New DocumentWhen adding a New Document to SharePoint, there are a few different ways this can be done: Starting in the Browser, Starting in Word, or Uploading an Existing document. The two ways to add a new document have been described below. The instructions for uploading an existing document are in the next section:
Starting in the Browser
Navigate to the folder or area you would like to add a new document in the Browser. From the top-level Menu, select File > New and choose the type of document you would like to add: Word, PowerPoint, Excel, etc. You can also add new folders from this menu as well.
Once you have created the document, you can rename it by selecting Rename from the menu, or you can click into the name of the document in Word Online to change the name. From there, you can work within the document, invite others to collaborate, etc. while SharePoint will be saving all your changes and versions in the background. By starting in SharePoint and navigating to where you’d like the document stored, it is automatically saved to this location in SharePoint.
Starting in an Installed Office Application
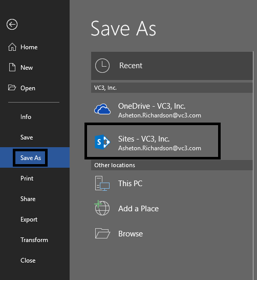 If you have already started a New document in Word (or other office program) and want to save that document to SharePoint, follow the steps below:
Select File > Save As
Locate the Sites option under your organization name, it will look something like this (VC3 used as an example). If you do not see this option, review how to Sign in to an installed application in the Signing into SharePoint section.
Locate the appropriate SharePoint site from the list of options (if you are following your site it will be under following), choose the correct folder/location, name the file, and hit Save.
From here you can continue working within the document and all changes will be saving to SharePoint as you go.
Check In and Check Out Documents
Check In and Check Out DocumentsSharePoint is meant for collaboration and working together, but there are situations that warrant the ability to lock down a document for editing temporarily. In order to do this, you can use the Check out feature.
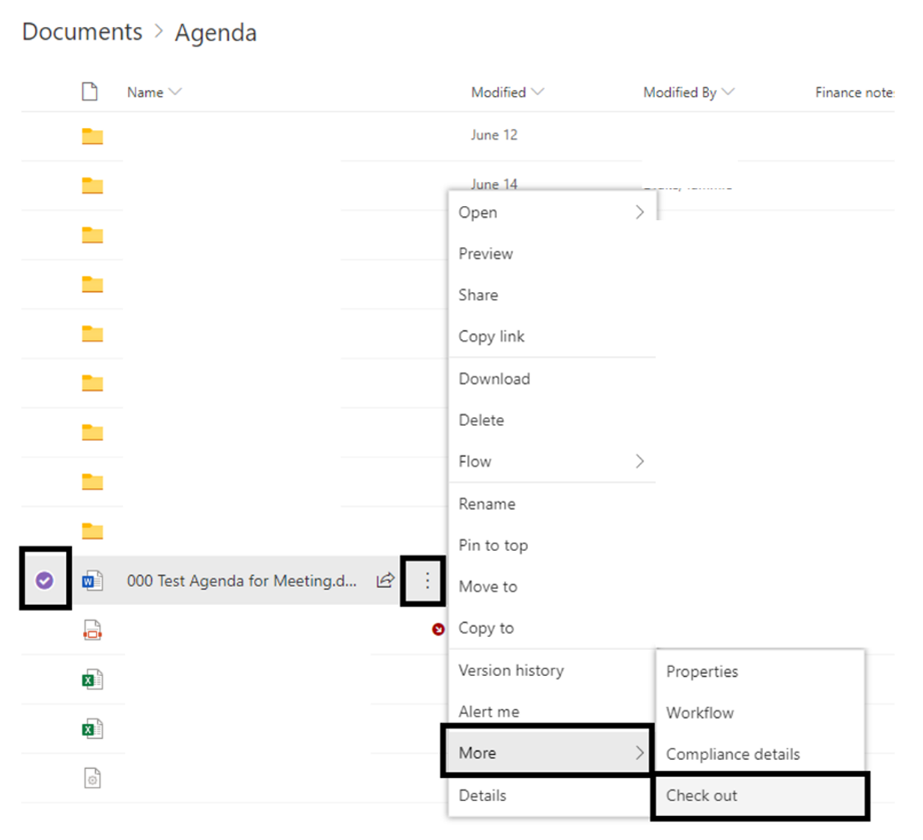
To check out a document:
- Navigate to the document you wish to lock for editing/check out and select it by checking the checkbox next to the document.
- Using the ellipses menu or the top ribbon menu, select Check Out. This will check out the document to you and lock it for editing by other users. Documents that are checked out will be notated by a red diagonal down arrow as seen in the screenshot below. Checked out documents can be checked in by an administrator if the need arises such as the user being out of office or no longer with the organization.
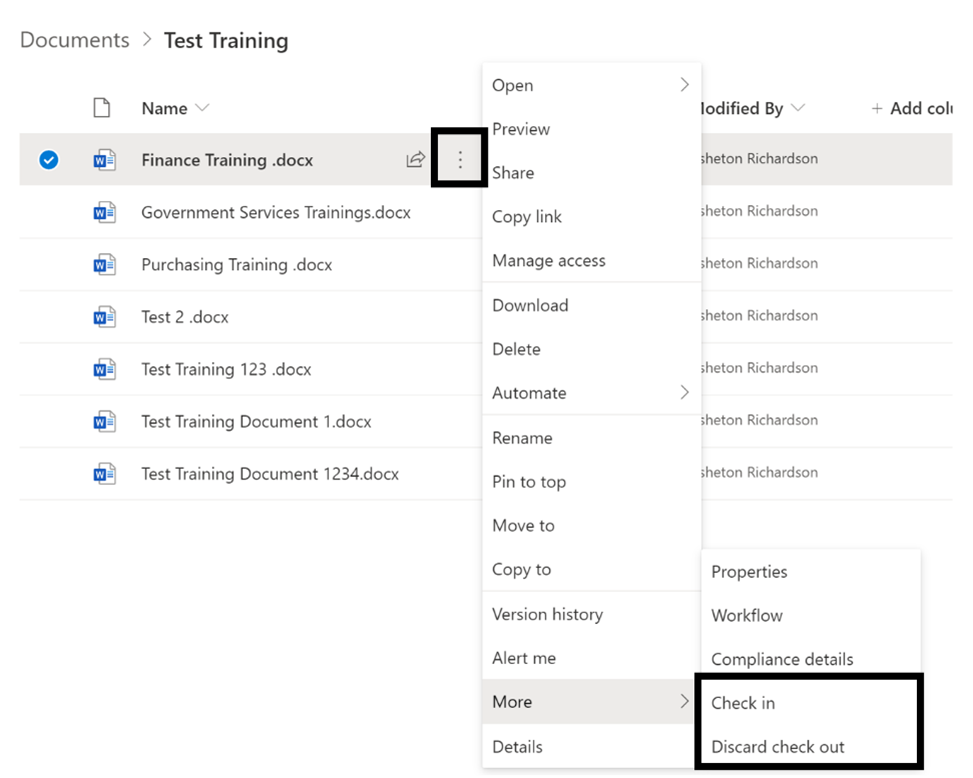
- When you are ready to check the document back in, follow the same steps and select Check In. During check in you can choose to discard your check out which will remove your changes and recent the document, or you can check it back in with your changes for others to access and edit as needed. Upon check in, you can submit a comment that summarizes your changes which will show in version history moving forward.
Deleting and Recovering Documents from Recycle Bin
Deleting and Recovering Documents from Recycle BinDeleting Documents
Deleted documents are kept in the recycle bin for 90 days. If you wish to recover a deleted document, ensure you go to the recycle bin before the 90-day window is up.
- To delete a document, you can either select the check mark next to the document and find delete from the top menu bar of the SharePoint site, or select the ellipses next to the document and select delete from the menu that appears next to the document.
Recovering Documents (Recycle Bin)
- In the top menu bar of the site, where the Office 365 and SharePoint labels are, you will see a settings icon on the right-hand side to the left of your name. From the settings menu, select Site Contents. Alternatively, you can also access the Recycle bin from the side menu.
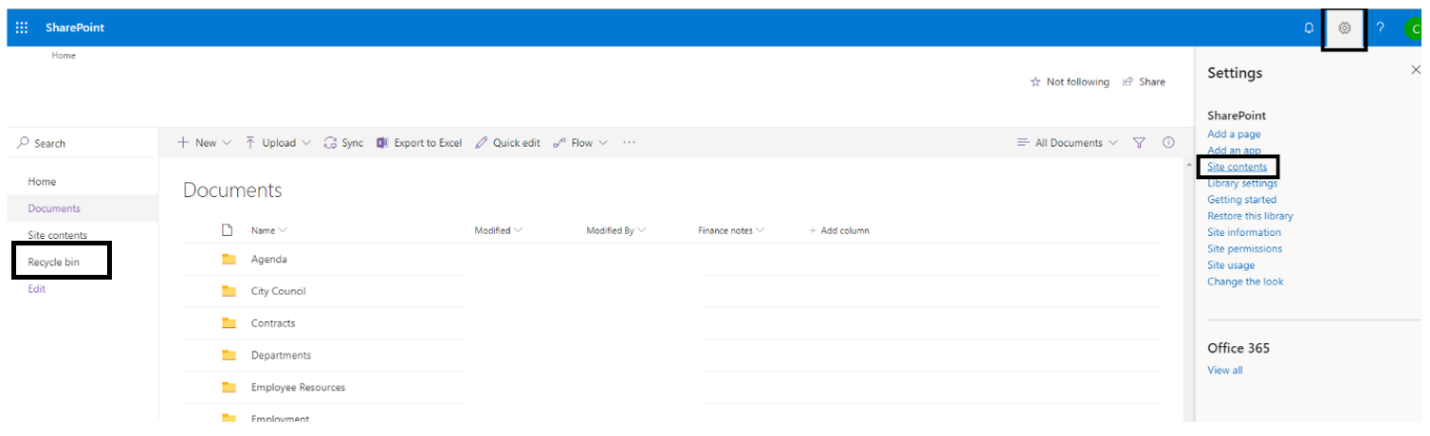
- Once in the Site Contents, locate the Recycle Bin in the top right of the menu bar.

- In the Recycle Bin, locate the document you lost, click on it, and click restore. The document will live in the Recycle Bin for 90 days before it is permanently deleted. If you’d like to permanently delete the document, select delete to permanently delete it from the recycle bin. You can also perform bulk actions on deleted documents such as restore or delete for multiple options at once. To do this select the checkmark next to each document then select your action.

Downloading Documents
Downloading DocumentsIf you wish to download a document, you can do so by selecting the download option from the ellipses menu. This is not recommended to be used often as it will create a duplicate copy of that file and any changes made to it after download will not be saved to the downloaded copy. There are some uses cases in which this can be helpful such as wanting to use the document as a starting point for a new document you are going to save elsewhere.
Best Practice
Documents should not be downloaded as it will create a duplicate of the document and disconnect that downloaded document from SharePoint. If you wish to use a document as a template for a new document, try the Copy To feature instead of the download.
Moving and Copying Documents
Moving and Copying DocumentsTo easily move documents within the same folder, you can use the drag and drop method. To move and copy documents that may be in different areas or deep folder structures, you can use Move to and Copy To.
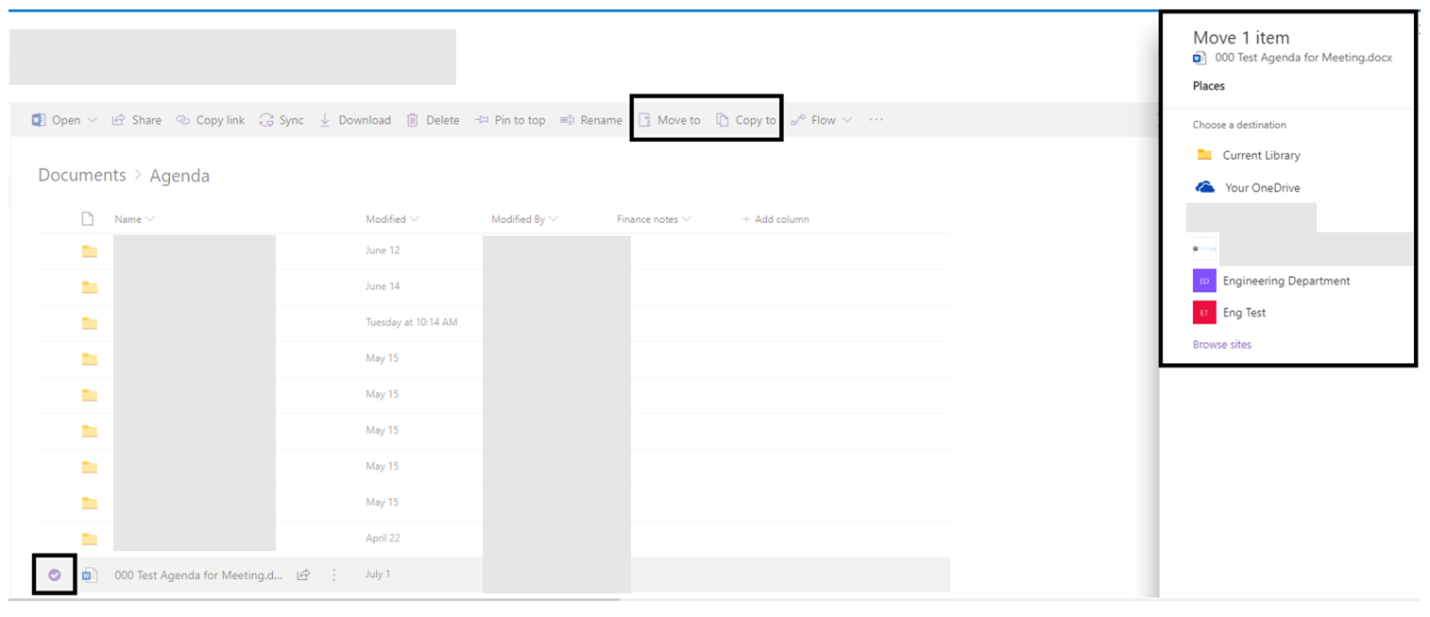
- Select the document you wish to move or copy by checking the checkbox next to it.
- In the top menu or ellipses menu, select Move To or Copy To. This will present you with the folder structure of SharePoint. Navigate through the structure as needed to find your destination and select Move or Copy To.
- You will be alerted when the action has been completed and you are ready to resume working in the top right menu. Once the action has completed, a link will be presented allowing you to navigate to the copied or moved file location.
Opening a Document
Opening a DocumentBy default, when clicking the name of a document SharePoint will open it in the Online version of the application it belongs to: Word, Excel, PowerPoint. If you are opening documents that are PDFs or Photos, it will open them in a browser tab. Any other document type will force a download.
If you wish to open a Microsoft based document in its native application and bypass the online application, you can select the ellipses menu next to the document and select open in App. This will launch the app on your computer and open the file in the native app.

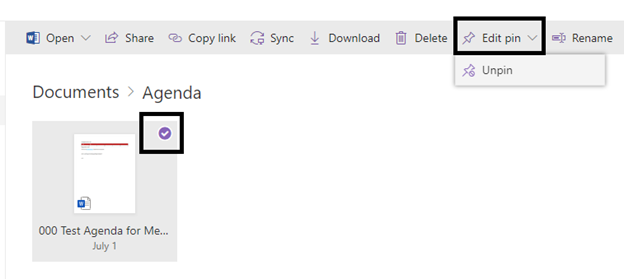
Pinning Files
Pinning FilesTo easily access a document or folder you will be working on often or that you interact with on a daily basis, you can use the pin feature to bring the document or folder to the top of your library. This feature is personal to your account, so what you pin will not affect what other users see.
To set up a pin:
1. Locate the folder or document you wish to pin and select it by checking the checkbox next to the document.
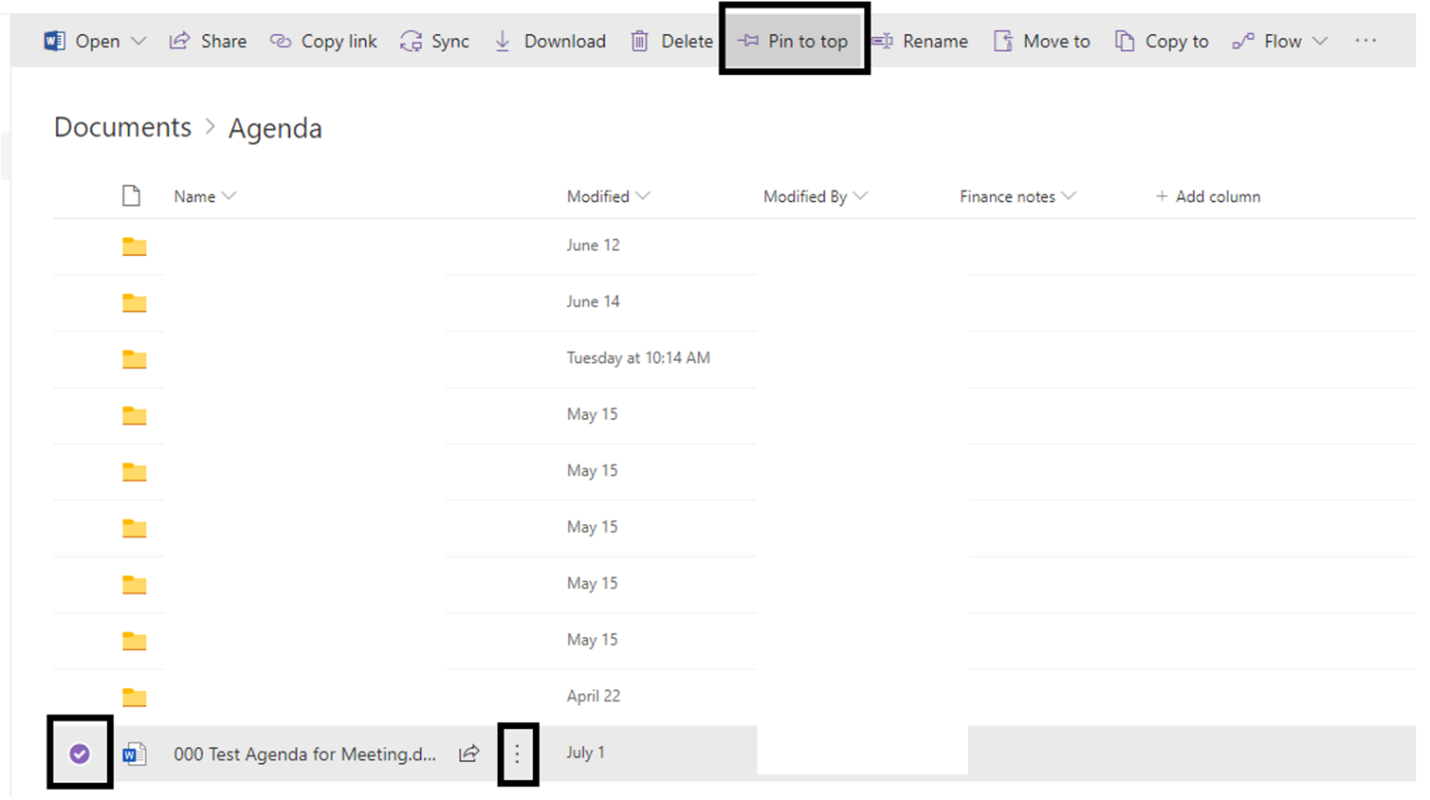
2. In the top menu or ellipses menu, select Pin to top. This will pin the document to the top of your page when accessing this area. If you wish to remove the pin, select the pin you wish to remove and follow the same steps to remove the pin by selecting Unpin. This feature is only one level deep meaning the pinned item will only show in the folder in which it resides. You also only have room for 4-5 pins. If more are desired, you will have to remove others
Upload Files to SharePoint (Browser, Drag and Drop)
Upload Files to SharePoint (Browser, Drag and Drop)There are a few different ways to upload documents to SharePoint: Browser / Drag and Drop.
Browser:
If you are working with a document you have already saved locally, the browser is the easiest way to save your document. Simply locate the area in SharePoint you would like to save the file, select Upload, and upload the file from where it is stored locally on your machine.
Additionally, you can create files directly through the browser which will save to the library and you can edit files in the browser which will save to the library.
Drag and Drop:
If you are working with a document you have saved locally AND you prefer the drag and drop experience, you can upload files using File Explorer. This method is preferable for uploading large amounts of files at once.
- Launch File Explorer on your machine and locate the file(s) you have saved locally.
- Find the area of SharePoint in which you would like to save the file
- You can open SharePoint in the Browser or drag and drop within your file explorer if you prefer.
- Once in your desired location, select the file(s) you would like to upload by highlighting all files and drag/drop into SharePoint.
- Browser: When dropping into the browser, you should see a transparent square with the files as you drag and the area in SharePoint you wish to drop them will highlight. You will be shown a progress of the files as they upload in the top-level menu and a confirmation message they have uploaded once it is complete.
- When dropping within File Explorer, you can hover over your SharePoint section, allow the folders to expand, and then drop where you would like.
Version History and Versioning
Version History and VersioningSharePoint is always saving your changes behind the scenes. There is no longer a need to save old copies of documents in order to access prior versions like V1, V2, etc. SharePoint keeps up to 500 versions of a document, once the 501st version is saved, the 1st version falls off.
If you would like to revert a document back to a prior version or to view the prior version of a document, locate the document in SharePoint, select the checkbox next to it, and from the top menu or the ellipses menu, find Version History:
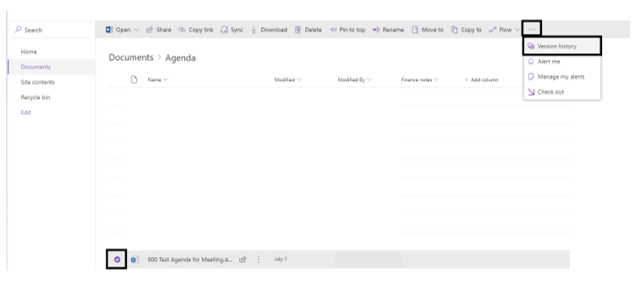
This will load the version history of the document for you to view and/or restore to a prior version. SharePoint does not remove versions, so if you restore version 6 out of 8, it will make a new version (9) a copy of the restored version (6) but still keep version 6 and so on.
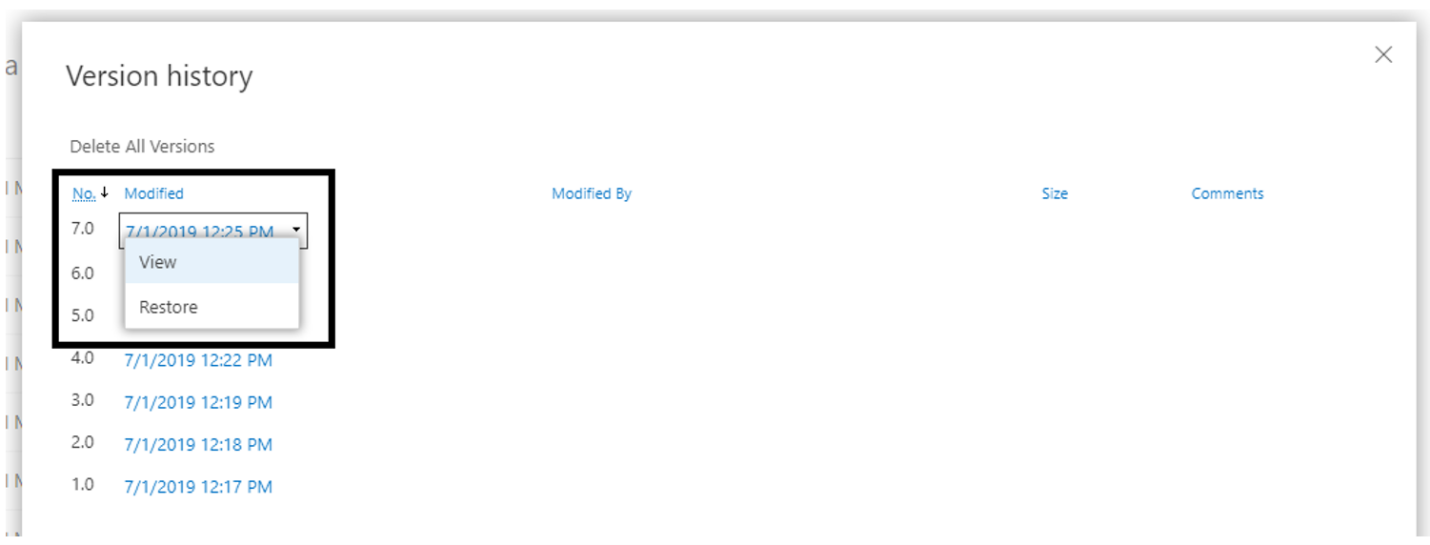
Alternatively, you can access version history from within an office application. To do this, you can select the down arrow from the top ribbon next to the document name and select version history. Or you can navigate to Review > Compare and view version history from there.