Working with Documents in OneDrive
Working with Documents in OneDriveAdding a New Document or Folder
Adding a New Document or FolderWhen adding a new document or folder to OneDrive, there are a few different ways this can be done: starting in the Browser, starting in an office application, or using your file explorer.
Starting in the Browser
Navigate to the folder or area in OneDrive you would like to add a new document to using a web browser. In the My files section, on the top-level Menu, select File > New and choose the type of document you would like to add: Word, PowerPoint, Excel, etc. This method is also how you can create new folders.

Once you have created the document, you can rename it by selecting Rename from the menu, or you can click into the name of the document in the online version of your Microsoft application. From there, you can work within the document, invite others to collaborate, etc. while OneDrive will be saving all your changes and versions in the background. By starting in OneDrive and navigating to where you would like the document stored, it is automatically saved to this location in OneDrive.
Starting in an Installed Office Application
If you have already started a New document in Word (or other office program) and want to save that document to OneDrive, follow the steps below:
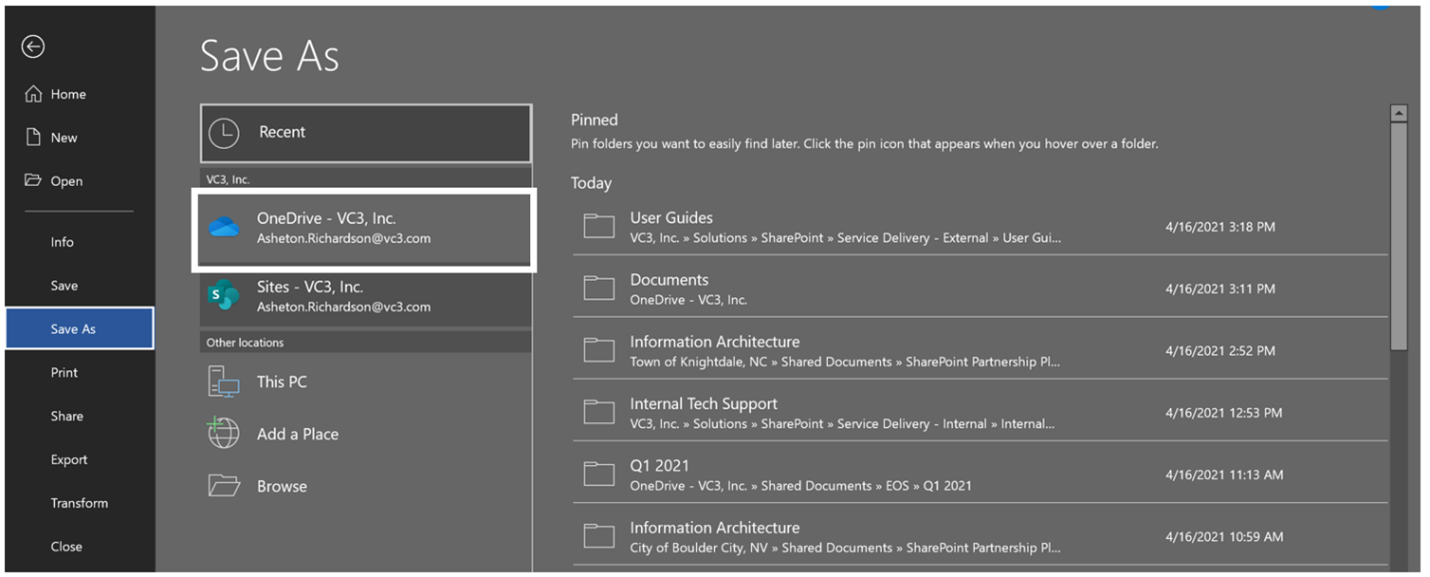
Select File > Save As
Locate the OneDrive option under your organization name, it will look something like this (VC3 used as an example). If you do not see this option, review how to Sign into an installed application in the Signing into OneDrive section.

Choose the correct folder/location, name the file, and hit Save.
From here you can continue working within the document and all changes will be saving to OneDrive as you go.
Deleting and Recovering Documents from Recycle Bin
Deleting and Recovering Documents from Recycle BinDeleting Documents
Deleted documents are kept in the recycle bin for 90 days. If you wish to recover a deleted document, ensure you go to the recycle bin before the 90-day window is up.
To delete a document, you can either select the check mark next to the document and find delete from the top menu bar of the SharePoint site, or select the ellipses next to the document and select delete from the menu that appears next to the document.
 Recovering Documents (Recycle Bin)
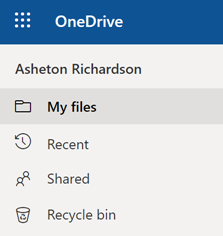
You will find your recycle bin in your left-hand menu of OneDrive.
In the Recycle Bin, locate the document you lost, click on it, and click restore. The document will live in the Recycle Bin for 90 days before it is permanently deleted. If you would like to permanently delete the document, select delete to permanently delete it from the recycle bin.
You can also perform bulk actions on deleted documents such as restore or delete for multiple options at once. To do this select the checkmark next to each document then select your action.
Downloading Documents
Downloading DocumentsIf you wish to download a document, you can do so by selecting the download option from the ellipses menu. This is not recommended to be used often as it will create a duplicate copy of that file and any changes made to it after download will not be saved to the downloaded copy. There are some uses cases in which this can be helpful such as wanting to use the document as a starting point for a new document you are going to save elsewhere.
Best Practice
Documents should not be downloaded as it will create a duplicate of the document and disconnect that downloaded document from SharePoint. If you wish to use a document as a template for a new document, try the Copy To feature instead of the download.
Moving and Copying Documents
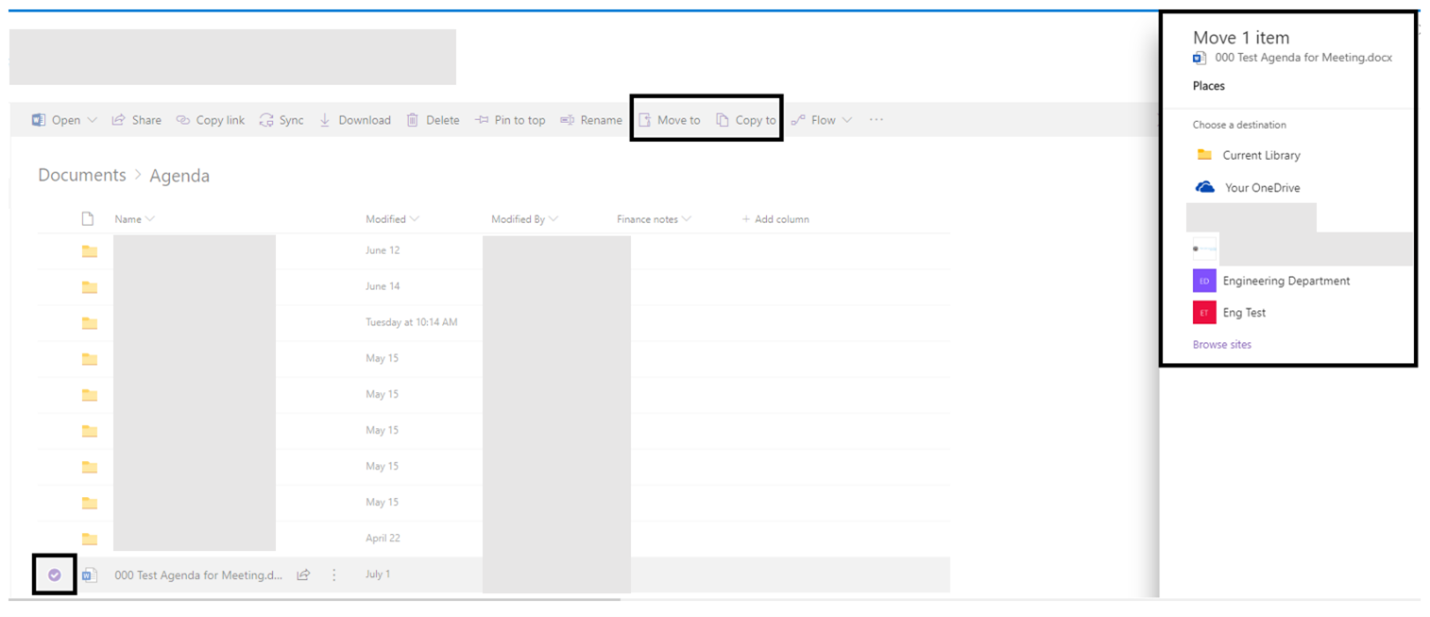
Moving and Copying DocumentsTo easily move documents within the same folder, you can use the drag and drop method. To move and copy documents that may be in different areas or deep folder structures, you can use Move to and Copy To.
- Select the document you wish to move or copy by checking the checkbox next to it or selecting the ellipses menu.
- In the top menu or ellipses menu, select Move To or Copy To. This will present you with the destination locations you have available to you. Navigate through the structure as needed to find your destination and select Move or Copy To. You can move and copy to your own OneDrive or other SharePoint libraries you are a member of.

- You will be alerted when the action has been completed and you are ready to resume working in the top right menu. Once the action has completed, a link will be presented allowing you to navigate to the copied or moved file location.
Opening a Document
Opening a DocumentBy default, when clicking the name of a document OneDrive through the browser it will open it in the Online version of the application it belongs to: Word, Excel, Visio, and PowerPoint. If you are opening documents that are PDFs or Photos, it will open them in a browser tab. Any other document type will force a download when opened from the browser due to the browser not having the correct application to launch the document. In the case you are opening a document that is not native to Microsoft Office, accessing your files through file explorer is recommended.
If you wish to open a Microsoft based document in its native application and bypass the online application, you can select the ellipses menu next to the document and select open in App. This will launch the app on your computer and open the file in the native app.

Upload Files to OneDrive (Browser, Drag and Drop)
Upload Files to OneDrive (Browser, Drag and Drop)There are a few different ways to upload documents to OneDrive: Browser and Drag and Drop.
Browser:
If you are working with a document, you have already saved locally, the browser is the easiest way to save your document. Simply locate the area in OneDrive you would like to save the file, select Upload, and upload the file from where it is stored locally on your machine.
Additionally, you can create files directly through the browser which will save to the library and you can edit files in the browser which will save to the library.
Drag and Drop:
If you are working with a document, you have saved locally AND you prefer the drag and drop experience, you can upload files using File Explorer. This method is preferable for uploading large amounts of files at once.
- Launch File Explorer on your machine and locate the file(s) you have saved locally.
- Find the area of OneDrive in which you would like to save the file.
- You can open OneDrive in the Browser or drag and drop within your file explorer if you prefer.
- Once in your desired location, select the file(s) you would like to upload by highlighting all files and drag/drop into OneDrive.
- Browser: When dropping into the browser, you should see a transparent square with the files as you drag and the area in OneDrive you wish to drop them will highlight. You will be shown a progress of the files as they upload in the top-level menu and a confirmation message they have uploaded once it is complete.
- When dropping within File Explorer, you can hover over your OneDrive section, allow the folders to expand, and then drop where you would like.
Version History and Versioning
Version History and VersioningOneDrive is always saving your changes behind the scenes. There is no longer a need to save old copies of documents to access prior versions like V1, V2, etc. SharePoint keeps up to 500 versions of a document, once the 501st version is saved, the 1st version falls off.
- If you would like to revert a document back to a prior version or to view the prior version of a document, locate the document in OneDrive, select the ellipses menu, and find Version History.
- This will load the version history of the document for you to view and/or restore to a prior version. OneDrive does not remove versions, so if you restore version 6 out of 8, it will make a new version (9) a copy of the restored version (6) but keep version 6 and so on. To take an action on a version, select the ellipses next to the version you wish to restore, view, or delete.

Alternatively, you can access version history from within an office application. To do this, you can select the down arrow from the top ribbon next to the document name and select version history. Or you can navigate to Review > Compare and view version history from there.