Drupal
DrupalDrupal is an open-source content management system (CMS). It's used by millions of people and organizations around the globe to build and maintain their websites. Drupal has great standard features, like easy content authoring, reliable performance, and excellent security.
Accessibility Checklist
Accessibility ChecklistThe checklist outlines key accessibility guidelines to follow when adding or updating website content. It covers areas such as images, links, headings, videos, and documents to help ensure your content is usable for all visitors and aligns with the latest accessibility standards (WCAG 2.1 Level A and AA). Regular use of this checklist helps prevent common issues and supports a more inclusive and compliant website experience.
Website Content Accessibility Checklist
Images
- Add meaningful alt text for all content images.
- Avoid embedding text inside images.
- Don’t rely on image alone to convey important information.
- Avoid Image-Only PDFs or Scans. If a flyer with event information is added to a page the following steps can be taken to make the content accessible:
- Use descriptive alt text for the image.
- Repeat all text from the flyer directly on the web page (either above or below the image).
- Add a heading or summary above the image to summarize the content. For example: “Event Details (also shows in flyer below)”
Headings
- Use heading levels to create a clear and logical structure. Start with Heading 2 for main sections (since Heading 1 is reserved for the page title), and use subsequent heading levels (e.g., Heading 3, Heading 4) as needed for subsections. Avoid skipping levels—for example, don’t jump from Heading 2 to Heading 4—so screen reader users can easily understand the content hierarchy.
- Do not use bold text to mimic headings, use actual heading tags.
Links
- Write descriptive link text (e.g., “View the annual report” instead of “Click here”).
- Avoid duplicate link text going to different places.
Lists
- Use ordered or unordered lists available in content editor for items that are lists.
- Do not create lists using dashes, numbers, or tabs manually.
Tables
- Use tables only for tabular data, not for layout.
- Include table headers to support accessibility and responsive design.
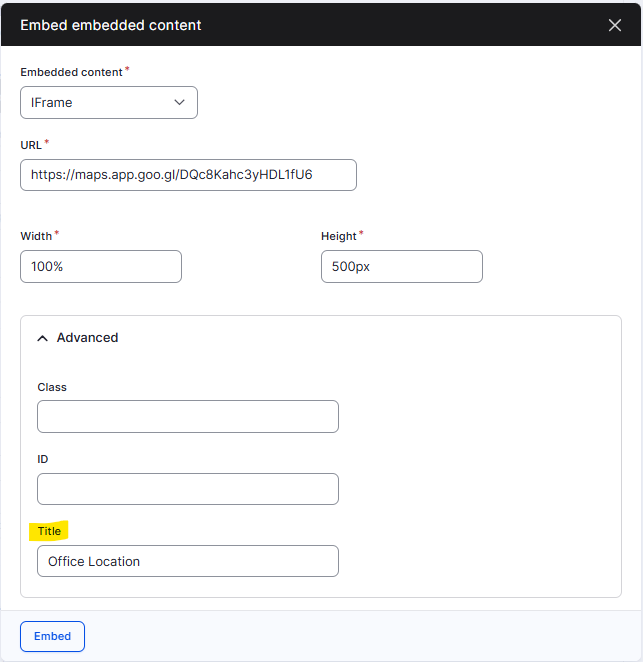
Embedding iFrame
- When embedding an iFrame using the Embed embedded content icon in the content editor, use the Title option under Advanced. This helps users who rely on screen readers understand the purpose of the embedded content, such as a video, map, or form.
Audio/Video
- Include captions and transcripts for videos.
- Ensure media players are keyboard-accessible. Most embedded players from platforms like YouTube and Vimeo support keyboard navigation.
Documents (PDF, Word, etc.)
- Documents have proper tags, alt text, and reading order.
- Test documents for accessibility:
Editoria11y Accessibility Checker
Use Editoria11y website accessibility checker to identify issues when posting content to the website. Many of the accessibility items described above are also covered by Editoria11y.
Learn more about how to use Editoria11y on your website
Real Time Reports
Periodically review the following Real Time Reports and resolve any issues found:
- Alt Tags
- View pages with missing alt tags.
- Add descriptive alt text to images to meet accessibility standards.
- Broken Links
- View pages containing broken links.
- Update or remove the broken links as needed.
- “Click Here” Links
- View pages that use “Click Here” as link text.
- Replace with meaningful, descriptive text that explains the link’s purpose.
Accessing Drupal
Accessing DrupalSigning In
Signing InTo go to your website login page, type your website URL into the address box and add "/user" at the end. For instance: https://testwebsite.com/user.
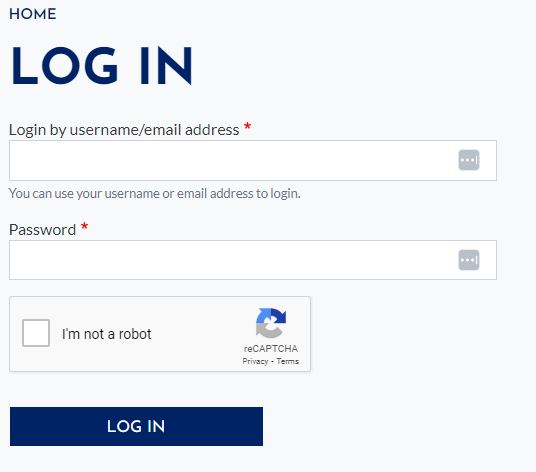
Enter your credentials. You can log in with either your username or email address.
Check "I'm not a robot" check box and then click the Log In button.
Reset your password
Reset your passwordTo go to your website login page, type your website URL into the address box and add "/user" at the end. For instance: https://testwebsite.com/user.

Click the Reset Password tab and enter your username or email address. Press the Submit button.
Add a New User
Add a New UserOn the Administration bar hover over People then select Add User.
Add the new user's email address, user name and temporary password (the user can change these when they log in for the first time)
Set your user's Role
Select whether you want to notify the user that their new account was created.
Select "Create new account" to finish
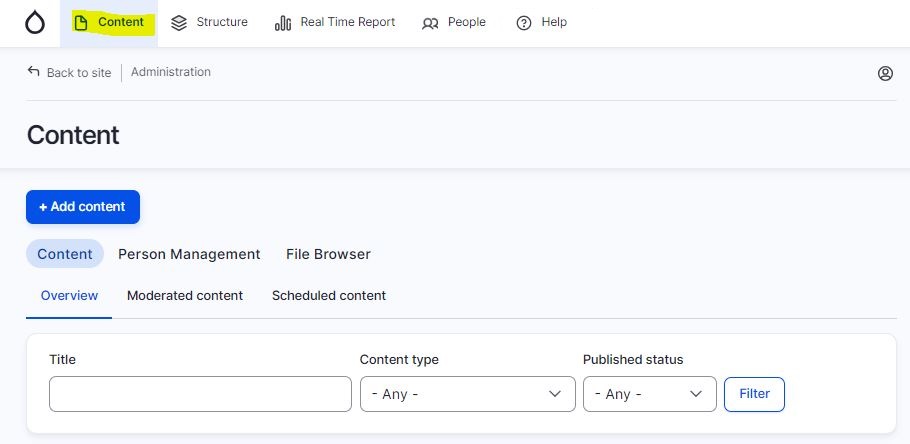
Content
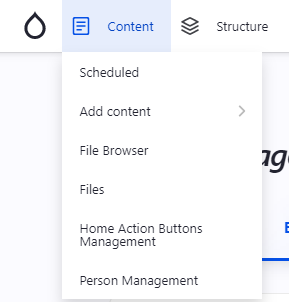
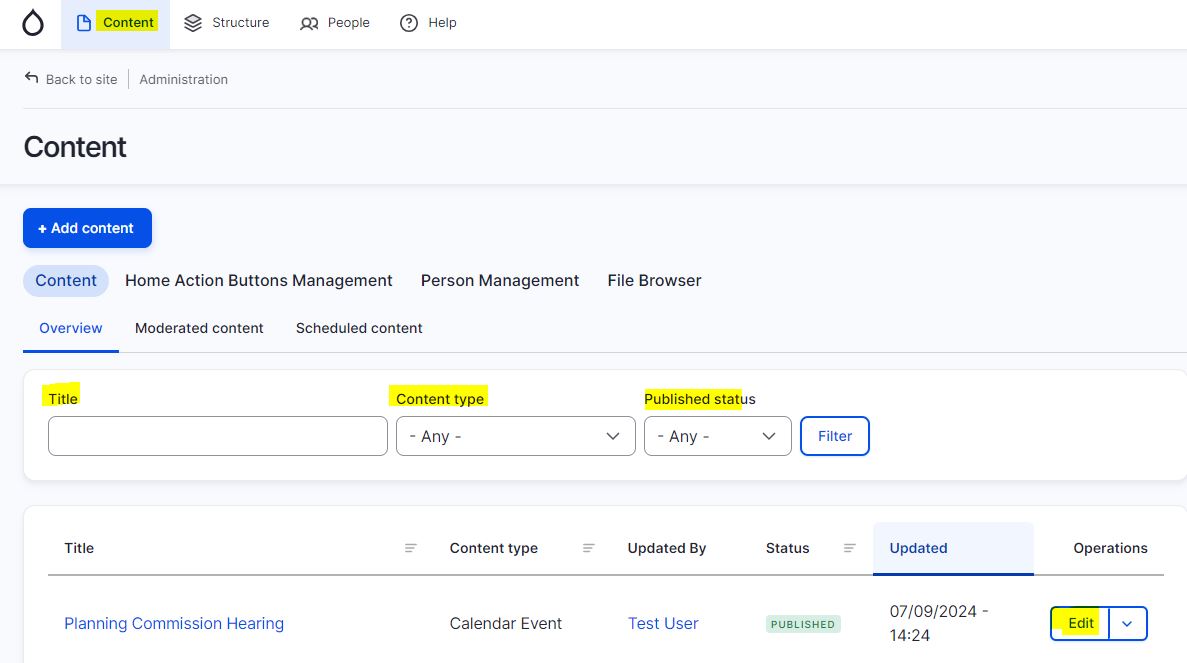
ContentWhen you are logged into the site you can access your site's content by navigating to the Content Page using the control Bar.

Under Content on the Control bar you can view scheduled content, add content, view your files in the site and the file browser, you can manage your Home Action Buttons, and manage "people" in the site.
On the Content page you can find all of the content you have in your site in a sortable/filterable table. Content can be filtered based on title, content type, and published/unpublished status.
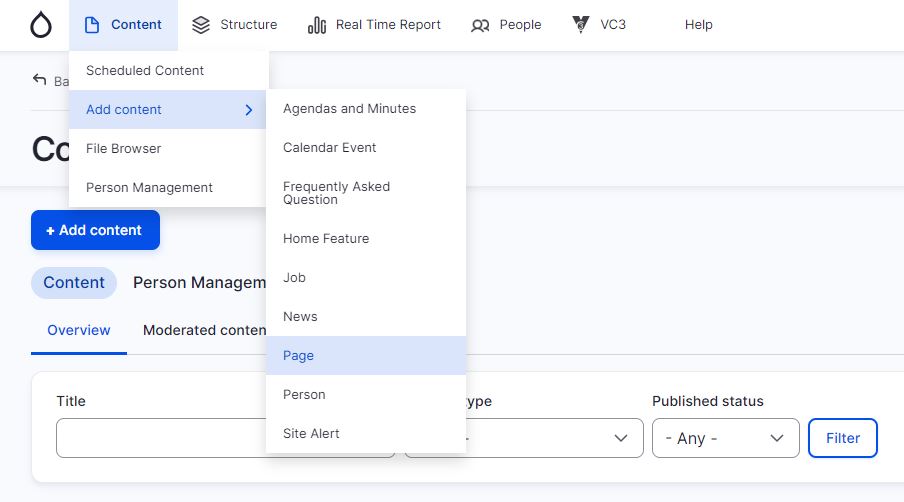
Adding Content
Adding Content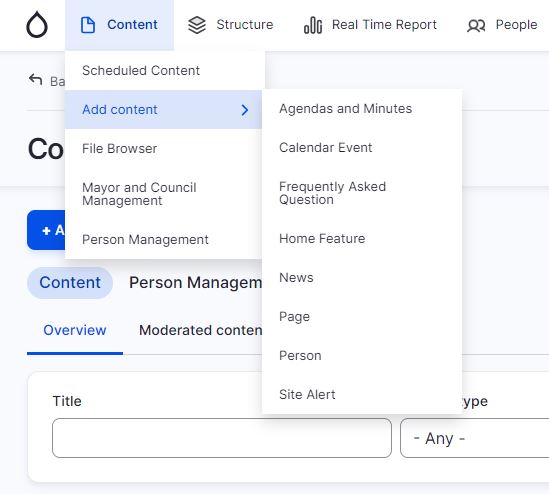 Once signed into your website, you can add content by navigating to to Content > Add Content. There you will find a list of Content Types to choose from.
A Content Type is a pre-defined collection of fields which relate to each other by an informational context. A developer can add new Content Types to collect specific information for display.
Standard content types on your site include:
- Agendas and Minutes
- Calendar Event
- Home Action Item
- Home Feature
- News
- Page
- Person
- Site Alert
Adding a Page Menu
Adding a Page MenuNavigate to the page where you want to put the page menu. On the right side of the screen, expand the Menu settings and click the Provide a menu link toggle. The Link title and the Parent menu choice will expand.
The Link title will be prepopulated with the page Title and can be updated as needed.
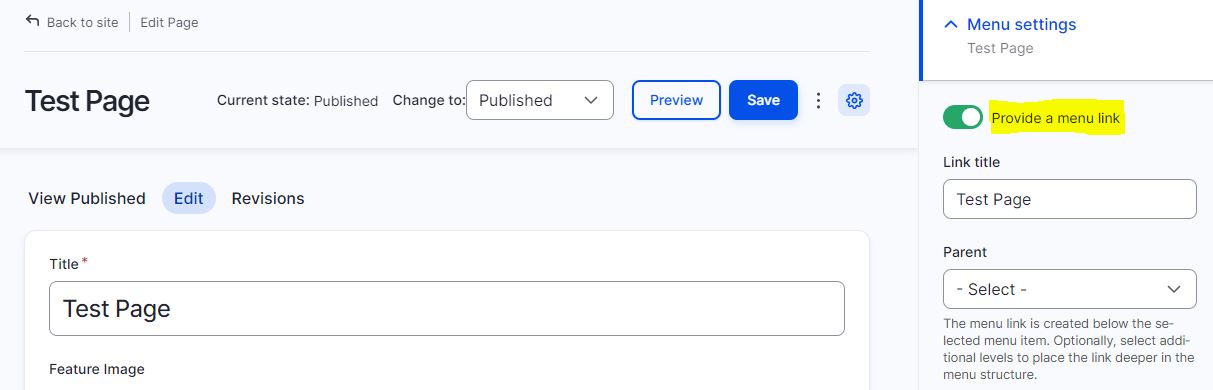
If you wish the page to be linked on the top menu, leave the Parent choice as is. Alternatively, choose an item from the Parent drop-down to set the page link menu within the menu structure you've chosen.
Adding a menu link
Adding a menu linkTo add a link to an external site or a document on the website, go to Structure -> Menus -> Main navigation -> Add link.
Enter your Menu link title, which will appear in the menu. In the Link input box, add the full URL link of an external site that begins with https:// or a path to the file on the website, as shown in the screenshot below:
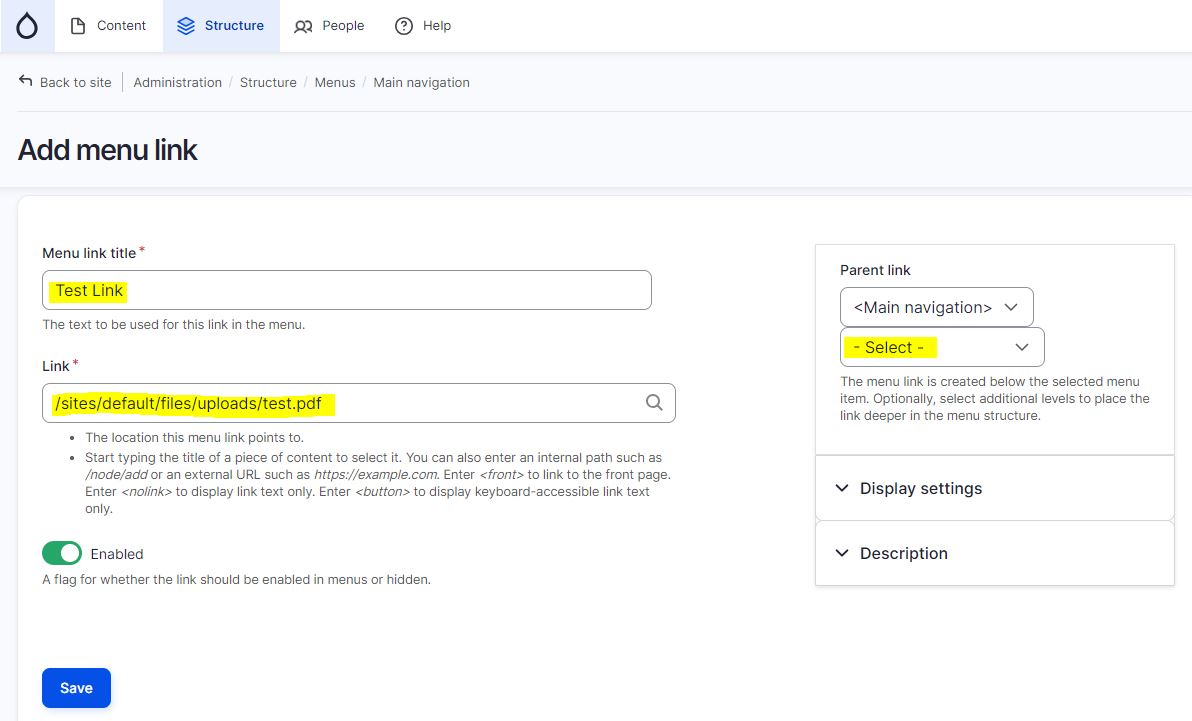
A page link can be added by entering the page name into the Link input box and selecting from the auto-populated values.
It is strongly advised to add page menus using the edit page interface.
Agendas and Minutes
Agendas and Minutes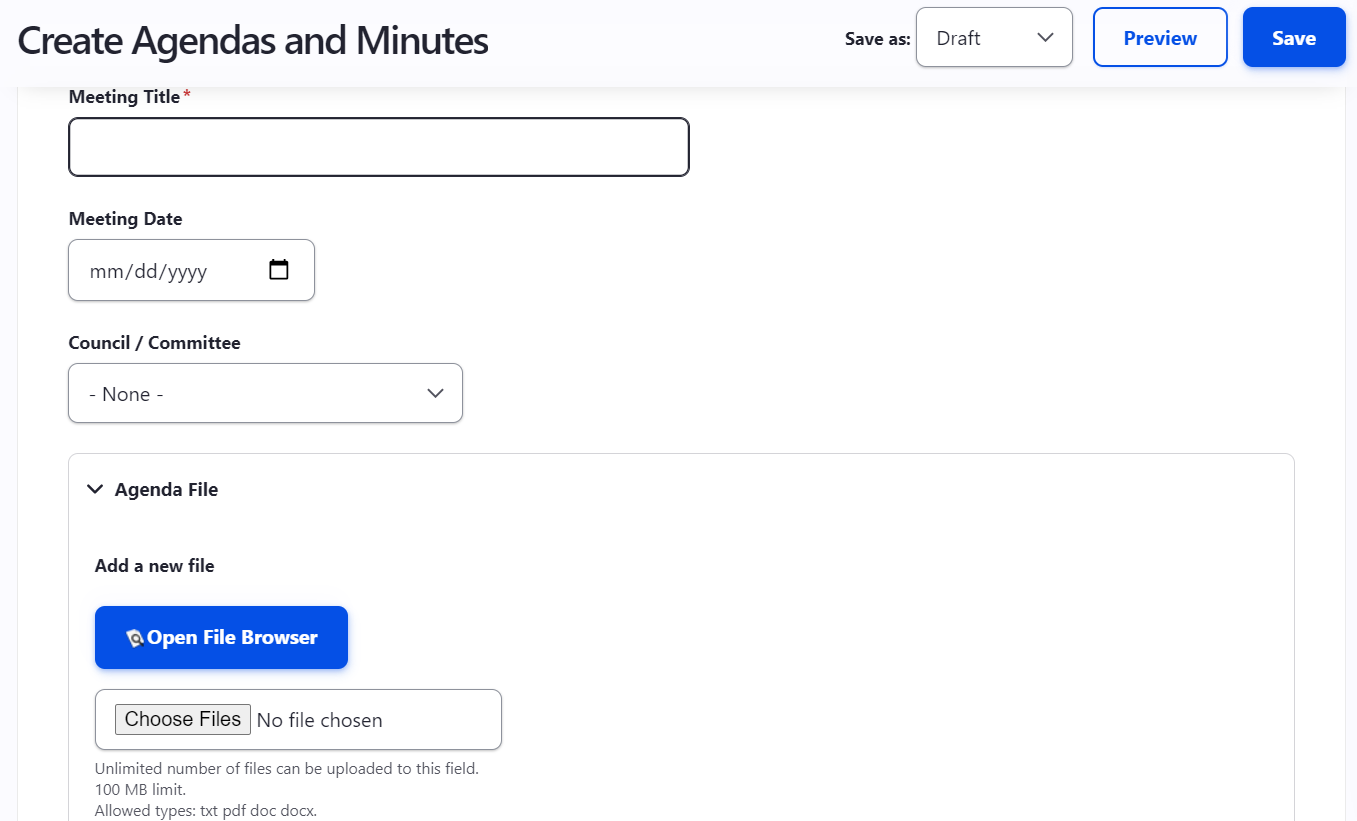 Agendas and Minutes can be easily added you your site by navigating to Content > Add Content > Agendas and Minutes. You will simply fill out the form and the site will format the Agendas and Minutes posts for you.
Fill out the following fields to add Agendas and Minutes:
When creating new Agendas and Minutes, you will start with the Meeting Title.
Next, you can add the meeting date using the date picker.
Organize Agendas and Minutes by selecting a Council/Committee. Selecting a Council or Committee will allow you to filter your posts.
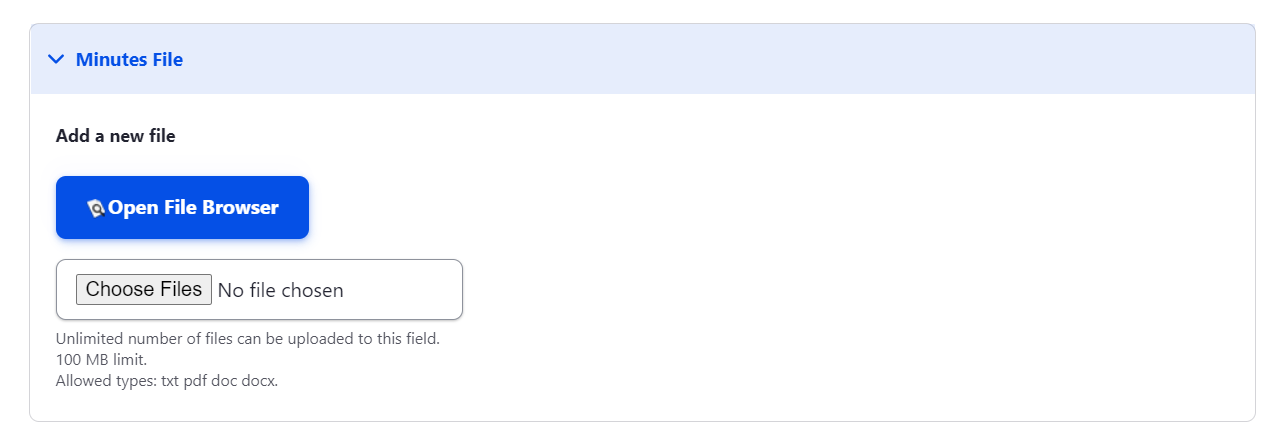 You can add an Agenda file directly to your post using the file browser. Open the File Browser and select your agenda file, or upload the file if you have not already added it to the site.
Learn more about the File Browser.
Adding Minutes files are the same as adding Agenda files; Open the File Browser and select your agenda file, or upload the file if you have not already added it to the site.
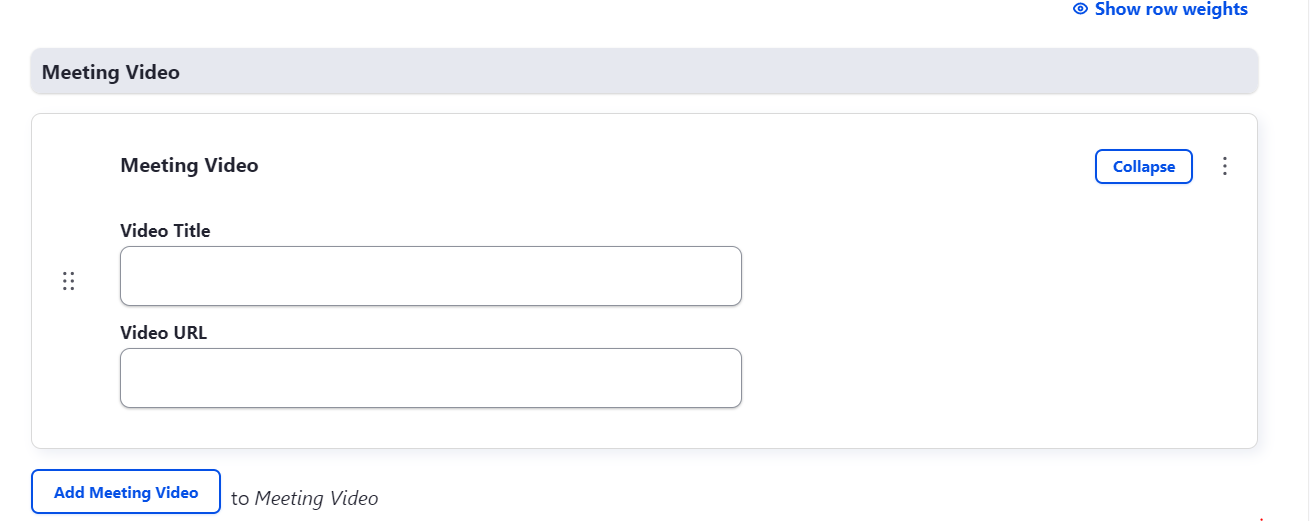
Drupal also allows you to add a meeting video to your Agendas and Minutes.; just type or paste in the video URL into the Meeting Video URL box. We recommend storing your videos on YouTube and linking them here using the video URL.
Meeting notes can be added at the bottom of the page using the standard text editor.
At the top right side of the page you can choose to promote your post to the Home Page.
Be sure to save as published if you wish to make your post live!
Calendar Events
Calendar EventsUnder Content > Add Content you can Find Calendar Events
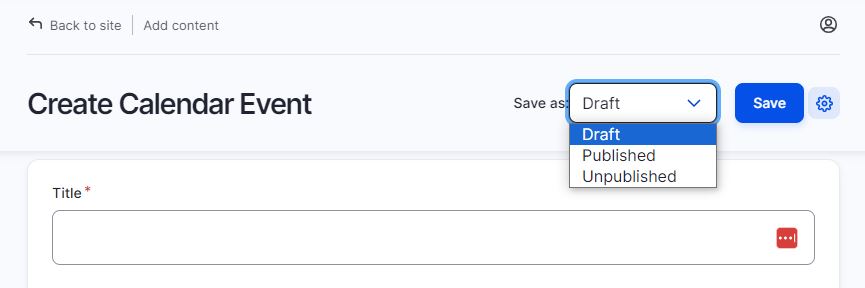
You can create a Calendar Event and publish it right away, or set it as a draft if you are not ready for it to be live on your website. Drafts can be found on the Content Page.
Once you fill out the required fields, the website will format your event and show it on the calendar.
To Set up a Calendar Event, you will need to give it a itle.
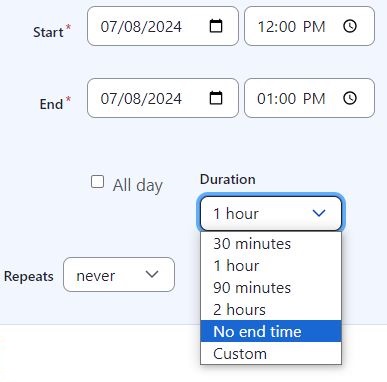
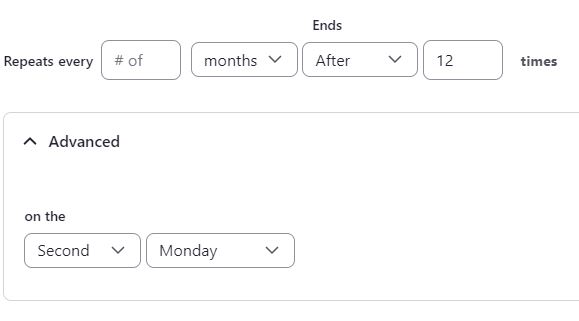
Next, you'll need to set up when the even is taking place. You will need to set the event date(s) and time, duration of the event, and if the event repeats and when it repeats.
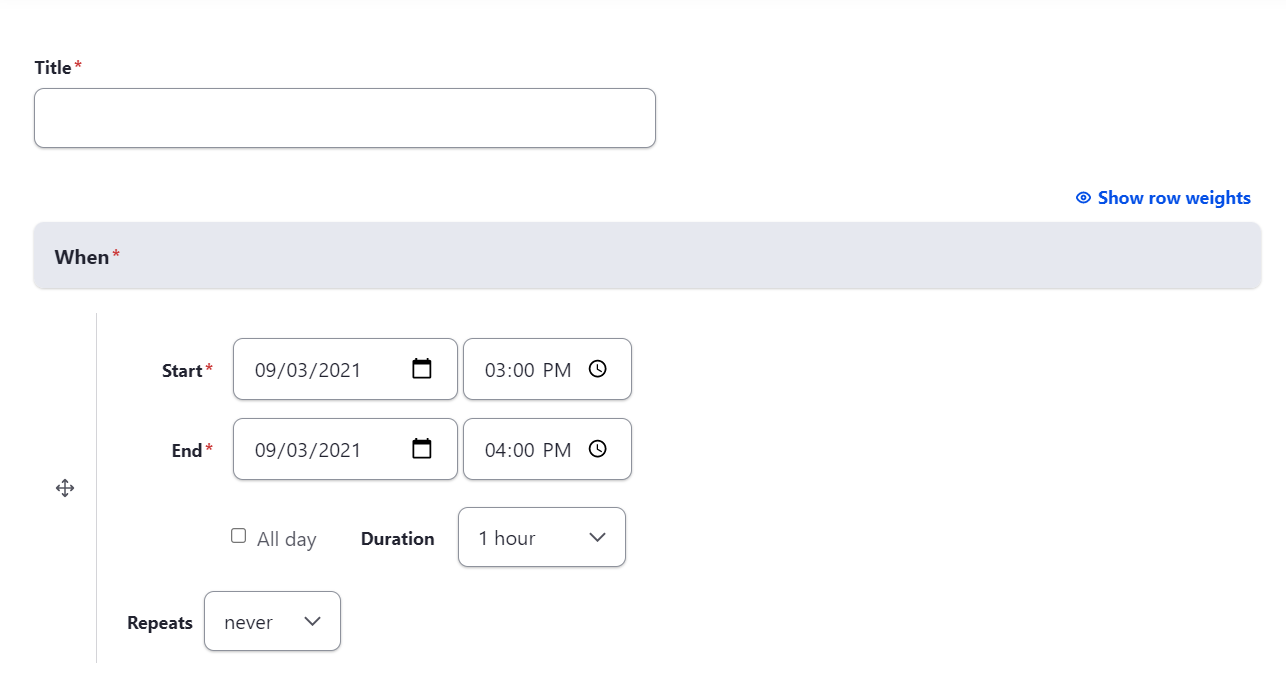
Duration can be set to No end time if the event end time is unknown:
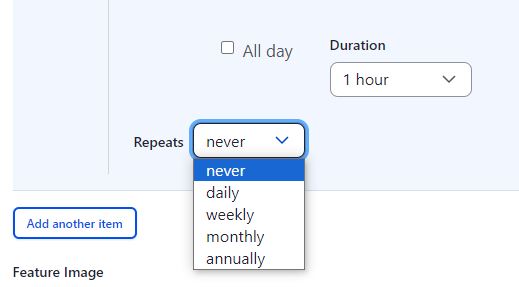
For recurring events, choose the Repeats option:
If monthly Repeats is selected, the screen will display the following options:
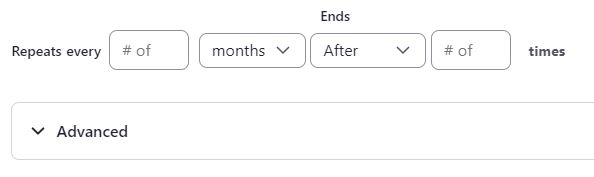
If you want the event to repeat every month, enter 1 or leave the first field (# of) empty; otherwise, provide a number of months.
In the Ends drop-down, select when the event will end—after a number of times or on a specific date:
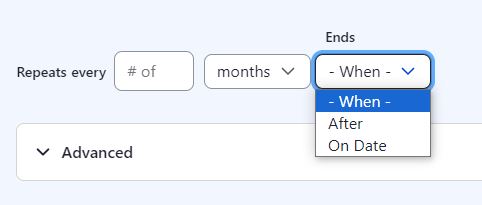
Open the Advanced settings and pick the event schedule, for example: Second Monday.
Read more about editing recurring events instances
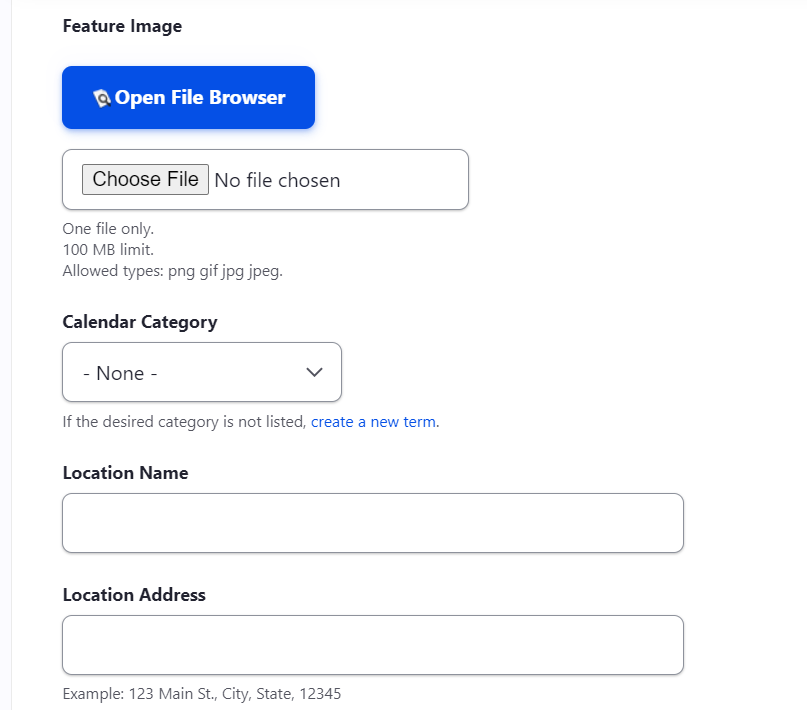
You can give your Calendar event a Feature Image when you create the event.
Calendar events can have Categories to help keep your calendar organized. You can also have several instances of the calendar in different areas of your site. Each instance of the calendar can be filtered with a different category, allowing you to show different information and events in the different areas of your site.
Give your Event a Location Name and Location Address so people know where your event will take place.
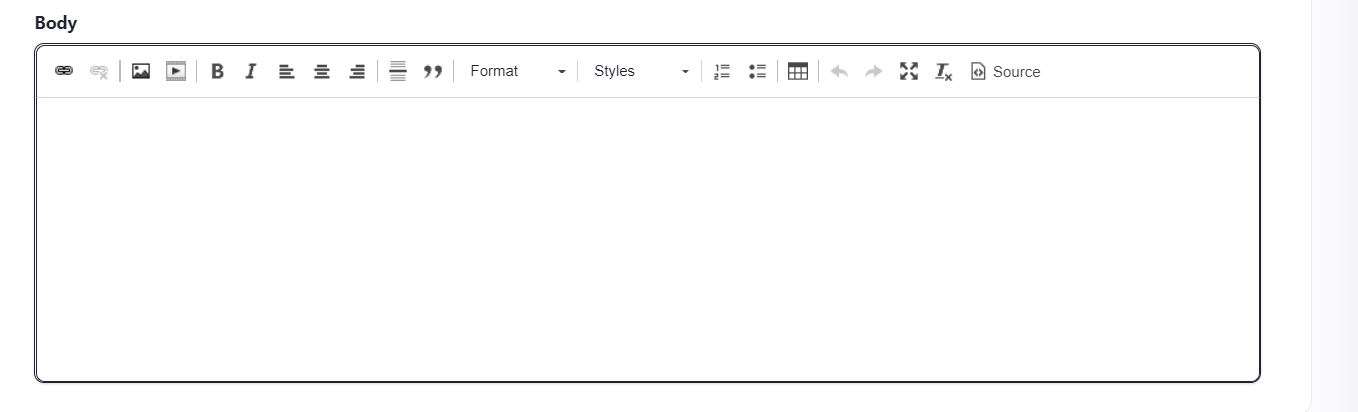
You can give your event a description in the text editor.
Creating a Page
Creating a PageTo create a new page you will need to be logged into the site as a user.
One you are logged in, you should navigate to Content at the top of the page, then Add Content, then Page.
You will then be directed to a blank page. Here you can:
- give the page a title
- add a feature image
- add content in the Text Editor
- set up the menu settings/where the page will show.
You also have the ability to add more Content Sections. Learn more about Content Sections.
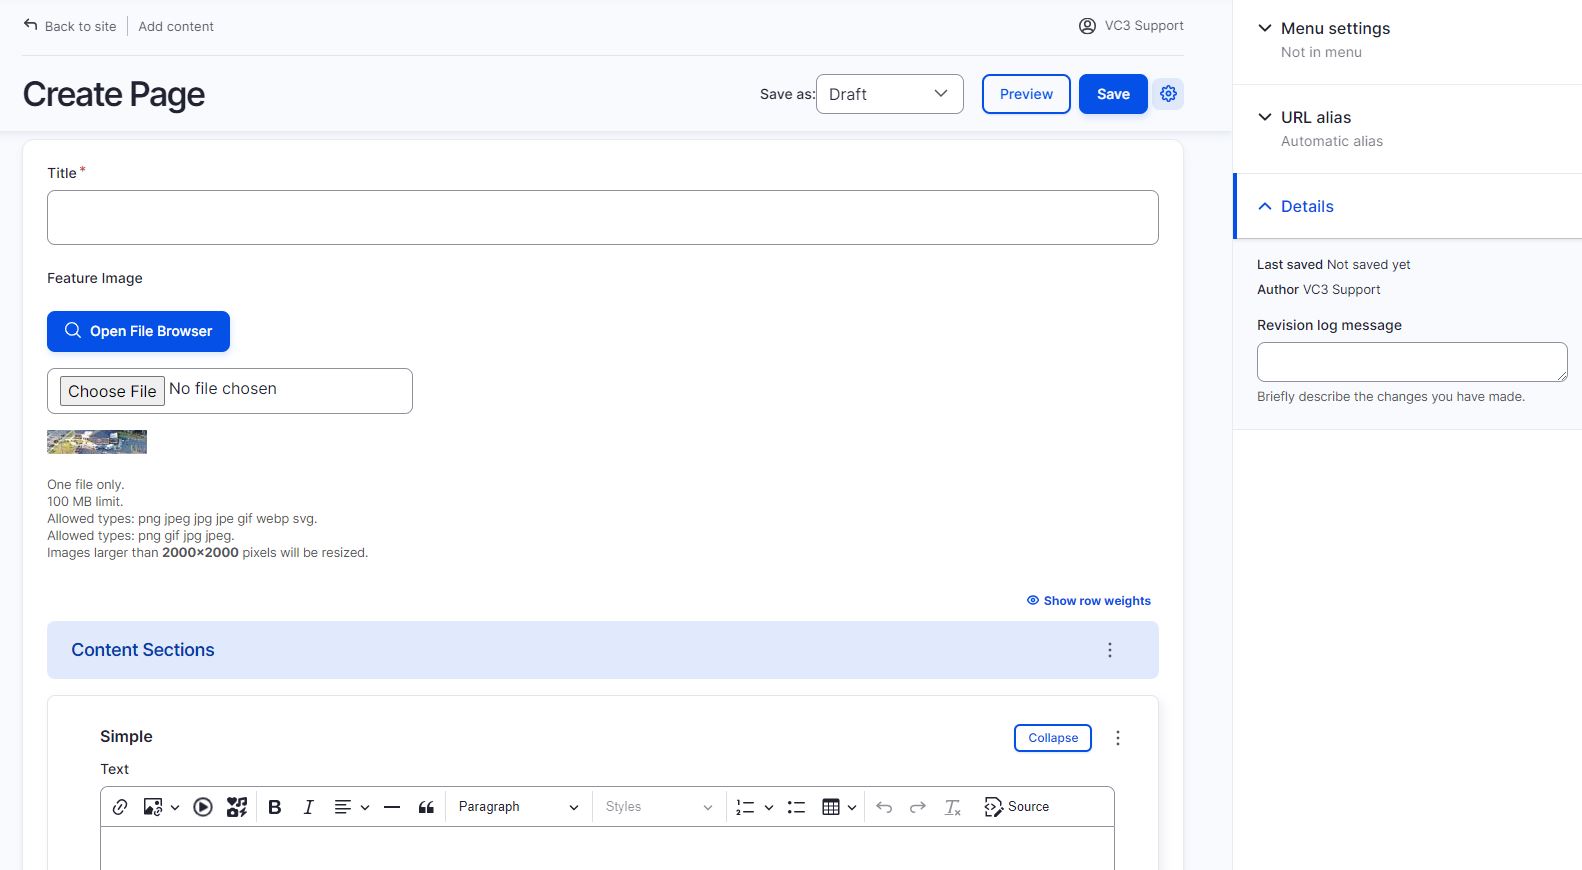
At the top of your page you will see the option to Save as: Draft or Published. Your Page needs to be saved as Published to be seen by the public. Saving the page as a draft is useful if you need to get the page started, but it is not ready to been seen by the public. You can save the page as a draft and access it later on the Content page.
Adding Images
Adding ImagesTo add an image to your page you should select the image icon in the WYSIWYG editor.
From there you will see the below Pop-up box to select your image. Select File Browser (magnifying glass icon) to search for, or upload your image to the site.
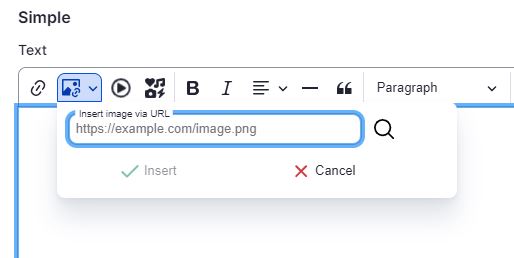
To upload a file, in the File Browser dialog box that opens, click on the Upload icon on the top menu, then the Add File button, and choose a file to upload from your computer. After uploading a file, click Select on the top menu to add the file to the page.
To remain ADA compliant, remember to fill out the Alternative Text box with a simple image description. Click on the Missing alternative text link as shown in the screenshot below, add the alternative text, and click the Insert link to add the text.
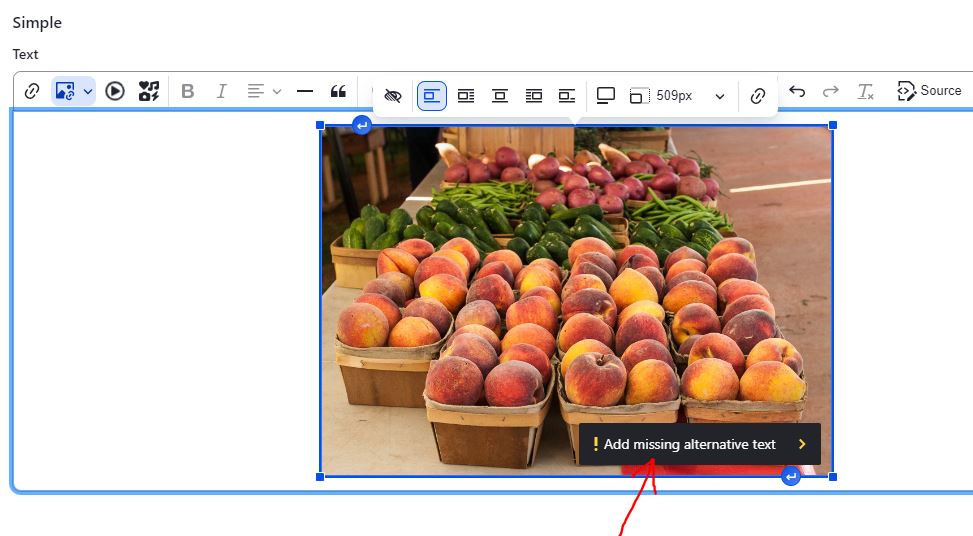
In the Insert Image pop-up box, you can select how to align the image on the page. The site will automatically align any text based on how you align the image.
You can also choose to add a caption to the image.
The image can also be resized by selecting one of the image corners and resizing the image size on the screen, or by choosing the original image size to restore the image size in the Resize image drop-down in the image menu.
The image can have a link added by selecting the Link Image icon (the last icon on the image menu screenshot below), adding a link URL, and selecting the save link.
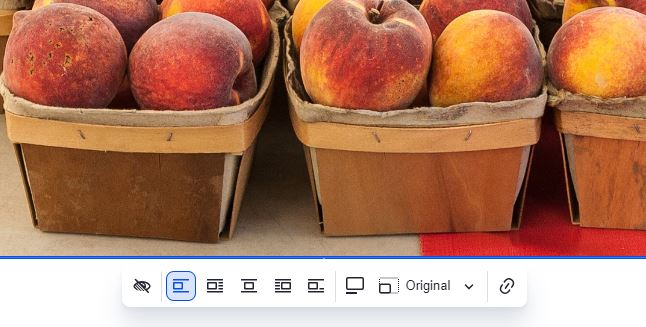
To access the image properties after you've added your image to the site you can click the image.
After making the image changes Save the page.
Adding Videos
Adding VideosAdd a video to your page by selecting the Video icon from the text editor.
The Video Embed box will pop up for you to fill out.

Insert the link to the video: It is recommended to store your videos on another platform, such as YouTube, and link them on your website.
Autoplay: this option will automatically start your video when a visitor comes to the page it is located.
Responsive Video: this option will automatically adjust the video to the size of a user's screen.
Don't forget to save!
Adding and Editing Links
Adding and Editing LinksThe first button in the text editor is the Link button. You can link internal pages, external websites, and documents using Links.
![]()
If you select the Link button you will open the Link dialogue box:
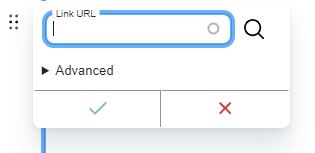
External Links:
Highlight the text you want to turn into a link and select the Link icon. Paste or type in the link URL in the Link dialogue box.
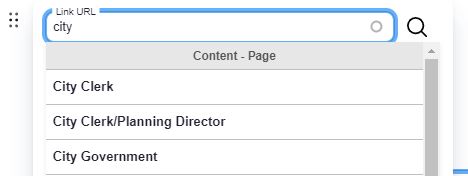
Internal links:
If the page you want to link to exists in your website, you can just search the page name in the Link dialogue box.
Highlight the text you want to turn into a link and select the Link icon. Start typing the name of the content you want to link in the bar and your website will show you any content with that name. Select the item you want from the list and click save check icon.
Documents (File Browser)
You can link files by linking from the File browser. Highlight the text you want to turn into a link and select the Link icon. Select "Open File Browser" and navigate to the file you with you link. Select the file by clicking on it then clicking Select at the top of the File Browser Window.
Learn more about the File Browser.
Edit Links
To Edit an existing link, place your cursor on the link and select the link icon, or click the link. This will open the Link Dialogue box where you can edit the link or open the File Browser to select a new document to link.
You can unlink an item by placing your cursor on the link and selection the Unlink Icon, next to the Link icon.

Content Sections
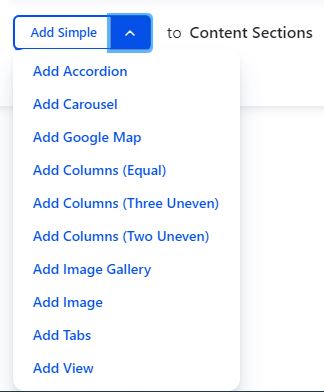
Content SectionsDrupal offers the ability to use Content Sections on pages to help organize and structure your content. The drop down menu can be found below the text editor on a page. You can add as many Content Sections to your page, as needed.
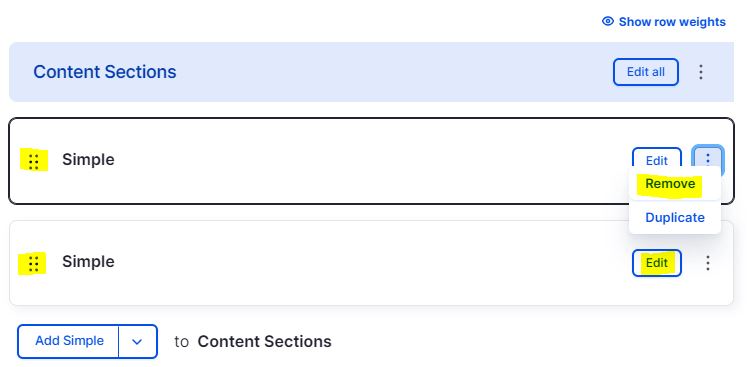
Reorganize your content sections on the page by dragging and dropping your sections to move them above or below other sections.
Delete a content section by selecting the ellipses in the top right corner of the section and selecting Remove. You will then need to select to Confirm Removal to fully remove the section.
To expand or collapse a section, use the Edit or Collapse buttons.
A Simple Content Section is the standard text editor present when you create a new page.
Accordion
Accordion Content Sections allow you to create expandable/collapsible content.
To Add an Accordion Section start by navigating to the bottom of your page and selecting Add Accordion form the Content Section drop-down list.
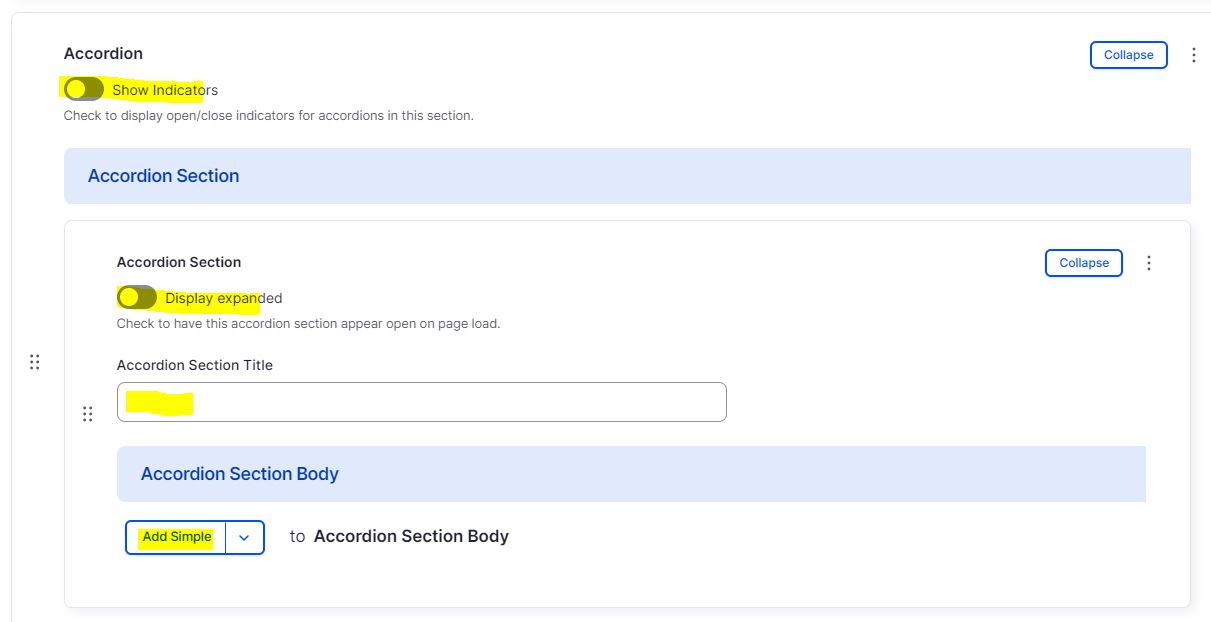
Select Show Indicators if you want to display open/close indicators for accordions (usually +/- signs).
You can choose to leave the accordion section collapsed or set it to be expanded by default by selecting the Display expanded toggle.
Next, fill out the Accordion Section Title. Once you save the content, clicking on the accordion title will expand the accordion section body.
Add your Accordion Section Body; here you will see a similar drop-down list to the Content Section List, but with slightly different choices. You can choose to format your Accordion section Body as Simple, Image, Google Map, or Columns (Equal, Three Uneven, Two Uneven). Once your body section is added, you can insert the desired content.
You can add multiple Body Sections to one Accordion Sections.
You can also add as many Accordion Sections as needed by selecting Add Accordion Section.
After content is added, save the page.
Carousel Content Sections allow you to add rotating content.
To add carousel content, pick Add Carousel from the Add Simple drop-down list and select one of the available sections: Simple, Image, Columns, or Google Map.
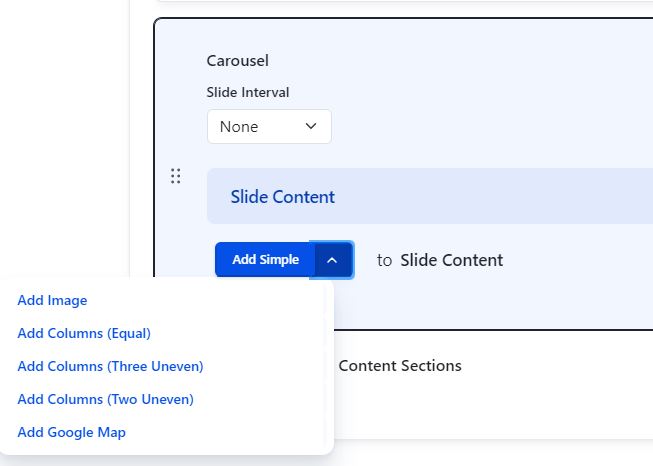
Fill out the content for the selected section. To add more carousel sections, repeat the process above. After you've added the content, save the page.
Choose the column type you want to add from the Add Simple dropdown: Equal, Three Uneven, or Two Uneven. The columns section will open.
Two Uneven Column Section
The screenshot below shows Two Uneven Column content section.
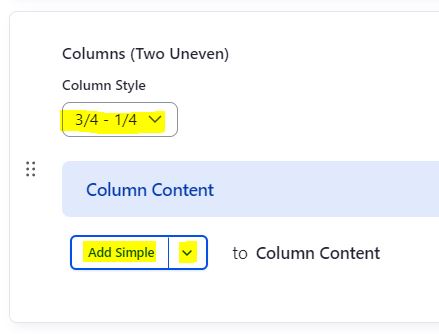
Choose Column Style from the drop-down menu. The Column Style defines the width of the left and right columns on the page.
Use the Add Simple button to create a section for each column (two sections for the Two Uneven Columns section) and fill it with the desired content.
The column content can be rearranged by dragging the part with the Change Order indicator on the left side of the column sections.
Save the changes by clicking the Save button in the top right corner of the page.
Equal Column Column Section
The Equal Columns feature allows you to add multiple columns to the page as necessary. Use the Add Simple button to create a section for each column and populated it with the content.
Save the page by pressing the Save button at the top right.
To add a Google Map to a page, pick Add Google Map from the Add Simple drop-down menu. If desired, provide the Map Title, which will be shown above the map, as well as the required Address.
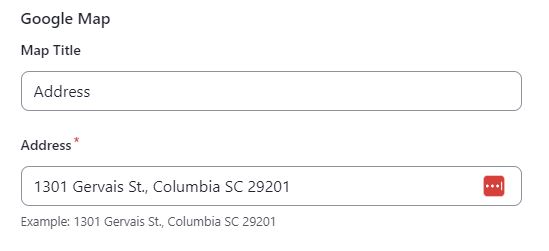
Preview or save the page.
Text Editing
Text EditingBelow is the standard text editor used in Drupal.
The features available to you, from left to right are:
- Link - add a like to your page
- Unlink - remove a link from your page
- Image - add an image to your page
- Video - add a video to your page
- Bold - make your text bold
- Italic - italicize your text
- Left Align - align your text to the left of the page
- Center Align - align your text to the center of the page
- Right Align - align your text to the right of the page
- Insert Horizontal Line - add a horizontal line to the page to break up text
- Block Quote - insert a large quote to your page
- Paragraph Format - change your text to a range of heading formats or to normal paragraph format
- Formatting Styles - this feature is usually locked to help keep you site consistent
- Numbered List - add and remove numbered lists
- Bulleted List - add and remove bulleted lists
- Table - add a table to your page
- Undo - undo your last edit
- Redo - redo your action
- Maximize - maximize the text editor
- Remove Formatting - remove the formatting from the text on your page
- Source
Uploading a PDF file
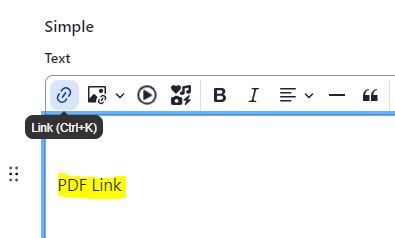
Uploading a PDF fileAdd a new PDF link
Type the text you want as a PDF or other file link. Highlight the text and then click the link icon in the content editor:
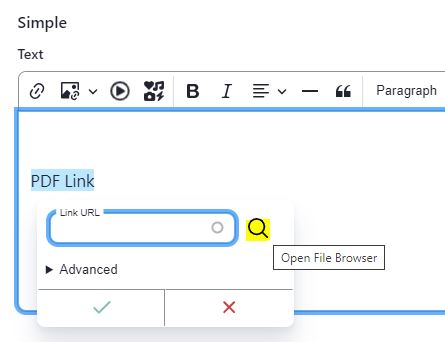
In the dialog box that opens, click the Open File Browser button next to the Link URL input box:
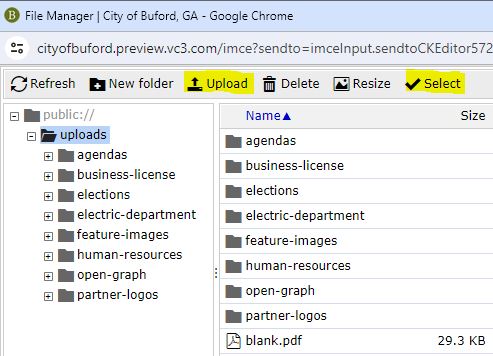
Select the folder to which you wish to upload a file. Click on the Upload link, select a file to upload, and then click the Open button. After uploading the file, click the Select link at the top of the File Manager dialog.
Click the Save button to save the page changes.
Edit a Link
To alter the link, click on it and then select the Edit Link or Unlink icon next to the Link URL entry box. Follow the instructions above to make the changes.
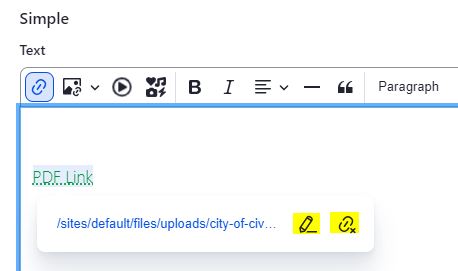
Click the Save button to save the page changes.
Home Action Items
Home Action Itemsinfo on home action items
Home Feature
Home Featurehome feature info
News
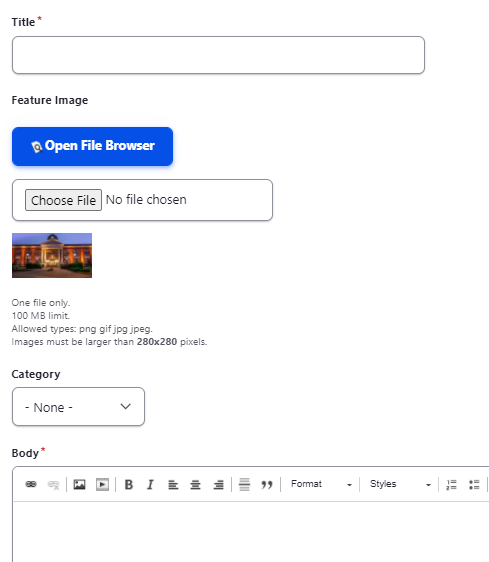
NewsAdd News to your website by navigating to Content >Add Content > News
To add News you will fill out a simple form, set up scheduling options, and decide to promote the post to the home page, if applicable.
- Start creating your news post by giving the post a Title.
- Give your post a feature image by selecting a photo from the File Browser.
- Remember to give your photo Alternative Text!
- Give your News post a category to help sort and filter posts.
- News Categories can be managed under Structure > Taxonomy > News Category
- Add the body to your news post next.
- The body is added using the standard text editor, so you can include links, images, and more to your news post.
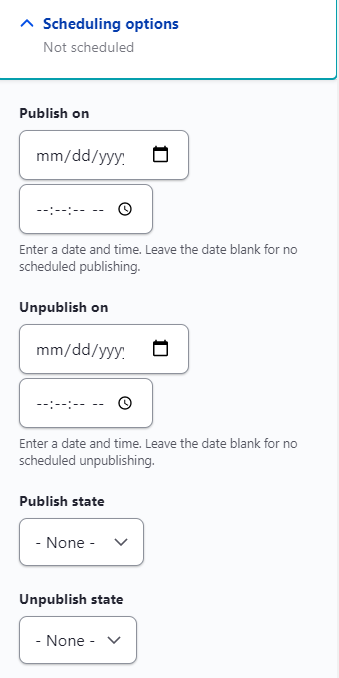
Next, you can set scheduling options for your News post:
- On the right side of the page open the Scheduling Options drop down
- Set your "Publish on" Date and Time to schedule when the post will be live to the public
- Set your "Unpublish on" Date and Time to schedule when the post will no longer be live to the public
- you can leave one or both of these sections blank of you do not wish to specify a publish or unpublish date/time
- Set your Publish state and Unpublish state, if applicable
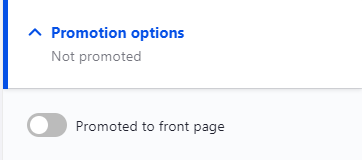
Next you can choose to promote your news post on the home page
- On the right side of the page open the Promotion Options drop down
- Select Promoted to front page
Finally, remember to Save and set your post as a Draft or Published!
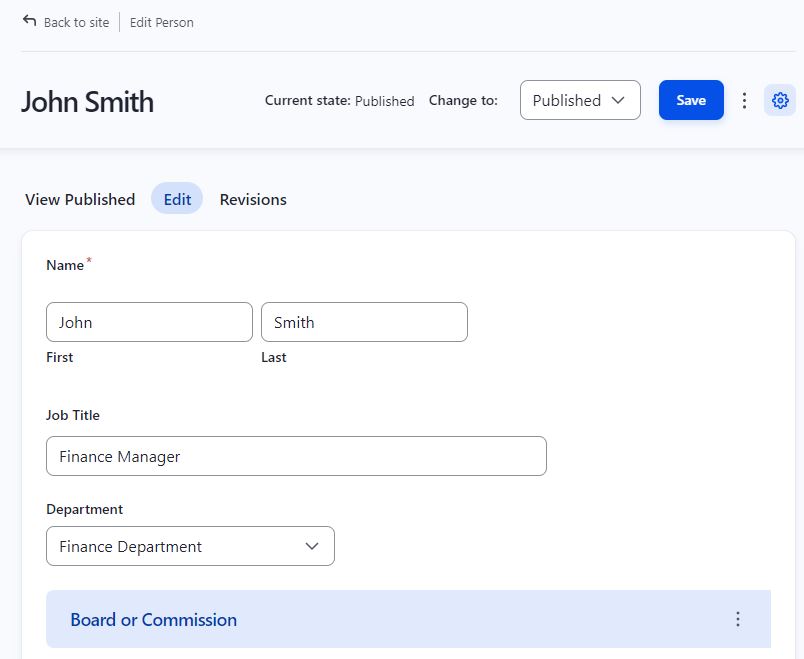
Person
PersonIf your website has contact information for various departments or a staff directory, the content is most likely stored in the Person content type. To add new person content to your website, go to Content -> Add Content -> Person.

Enter the person's details, select the desired state (Draft, Published, Unpublished) from the Save as drop-down menu, and save the content. The new contact information will be displayed for the associated Department, Board, or Commission.
Site Alerts
Site AlertsMultiple site alerts can be posted to a website. If more than one site alert content is added, then it will be displayed as a carousel (for header placement site alert content).
To add a Site Alert to the website, start by navigating to Content -> Add Content -> Site Alert. On the page that opens, populate the following information:
- Title – A message that will be displayed on the site alert section:
- Severity – Choose from the available options.
- Information – green site alert background;
- Warning – orange site alert background;
- Danger – red site alert background.
- Placement – Header or pop-up. A header will be displayed at the top of the website’s page. A pop-up will be displayed as a pop-up window.
- Override Link – If you would like the site alert to link to a specific page on the website or an external site, then start typing a page name and the drop down will show available pages on the website or enter an external page URL. This page will open when users click on the site alert title. The override links field is optional and if no content is added to the field then the site alert will display content posted into a body field if it’s populated.
- Body – information that will be displayed when users click on the site alert title. This field is optional.
- Display Pages – list of pages for which the site alert will be displayed. One or more pages can be added. If no page is selected, then the site alert will be displayed on all website's pages.
- Scheduling options – displayed on the right side of the site alert add/edit view page to publish and unpublish the content.
More information can be found on the site alert page under the input fields.
Editing Content
Editing ContentOnce logged into your website, you can edit content by heading to the page you want to update or by opening the Content page, where you can find and modify all site content. The content can be filtered based on the Title, Content type, or Published status.
Most websites will include the following content types:
- Agendas and Minutes
- Calendar Event
- Frequently Asked Questions
- Home Action Buttons
- Home Feature
- News
- Page
- Person
- Site Alert
Editing Person
Editing PersonTo modify an individual's contact details, log in to the website and navigate to the Content page. Look up the individual's name in the Title text field or filter by the Person type.
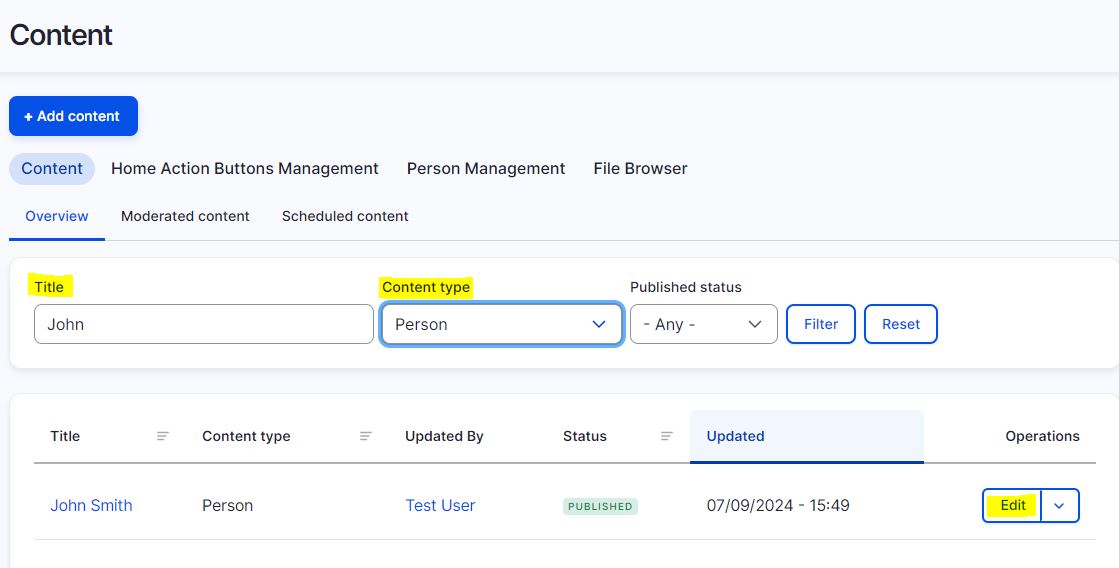
Click the Edit button next to the found person's name. Change the details and then click the Save button to save your changes.
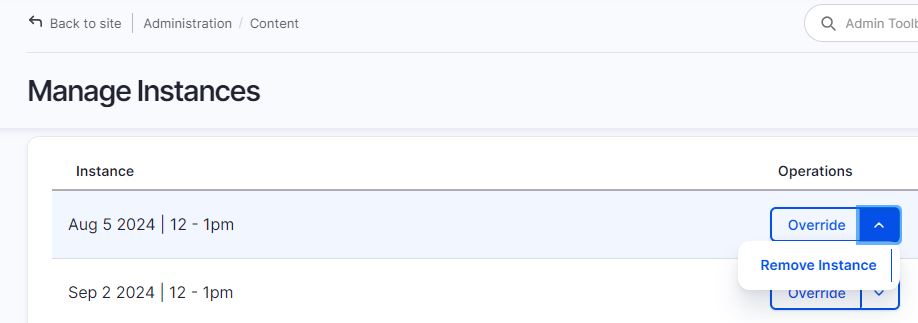
Editing Recurring Calendar Event
Editing Recurring Calendar EventTo modify your recurring calendar event, go to the event you wish to change and click on the Edit tab.
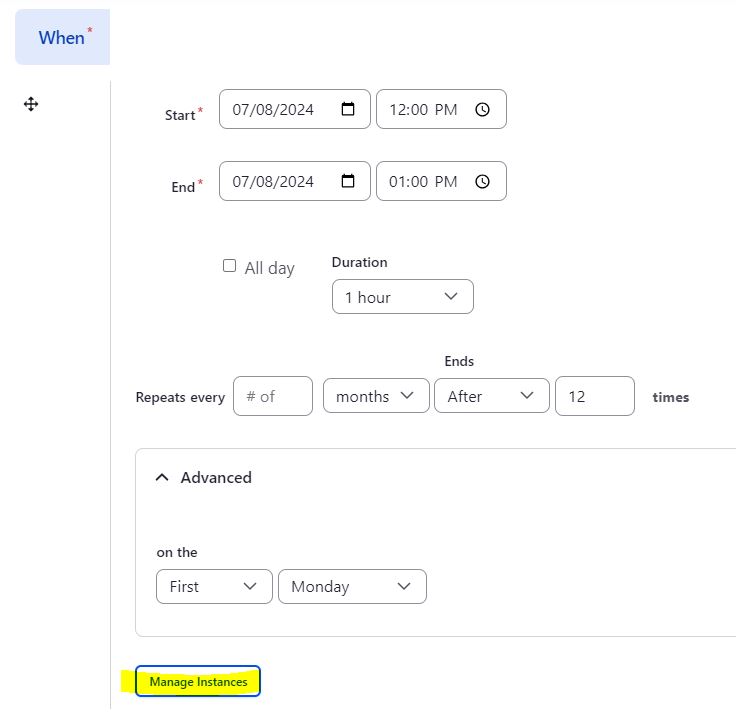
Click on the Manage Instances button to open the Manage Instances screen. To modify the event instances, click the Override button to change the instance date, time, length, or add more information, or pick Remove Instance to delete the event. Click the Save button to save your changes.
Editing an Existing Page
Editing an Existing PageTo edit an exiting page, you must first be logged in.
Once you are logged in, navigate to the page you wish to edit. There you will find a few tabs at the top of the page; Edit, Delete Content, and Revisions. Select Edit to make changes to your page.
You can also find the page you would like to edit by searching for it on the Content page.
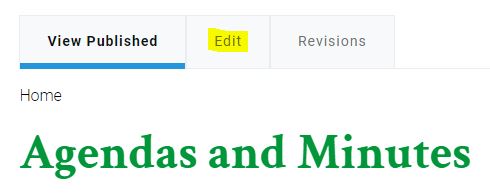
At the top of the page, you can change the status of your page to Draft, Published, or Unpublished, preview your page by clicking the Preview button, and save your page by clicking Save.
Once you have finished editing your page, remember to save. The Save button is at the top of the page.
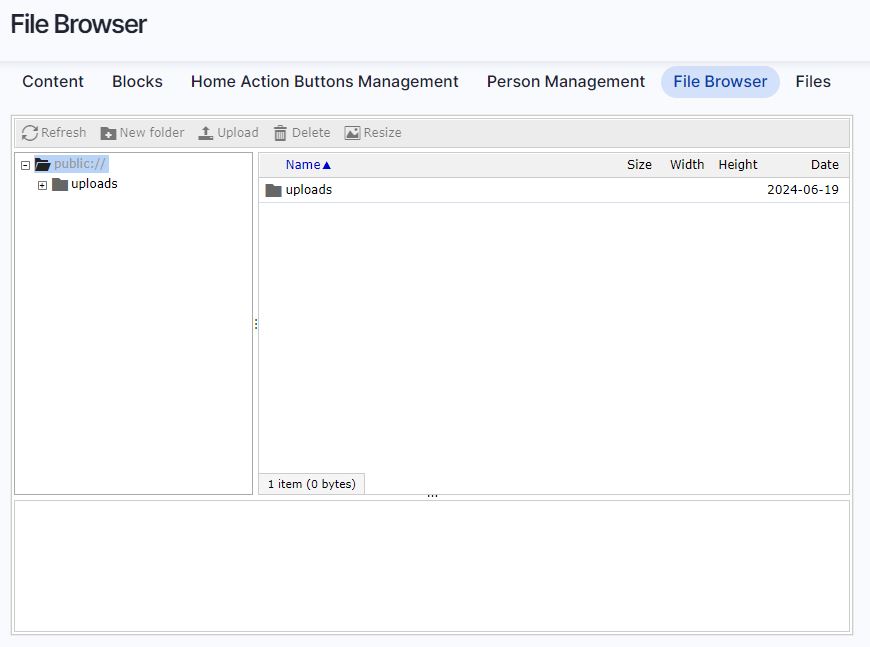
File Browser
File BrowserUnder Content > File Browser, you can access a file browser for all of the files on your website. You can view and upload files using a file browser interface.
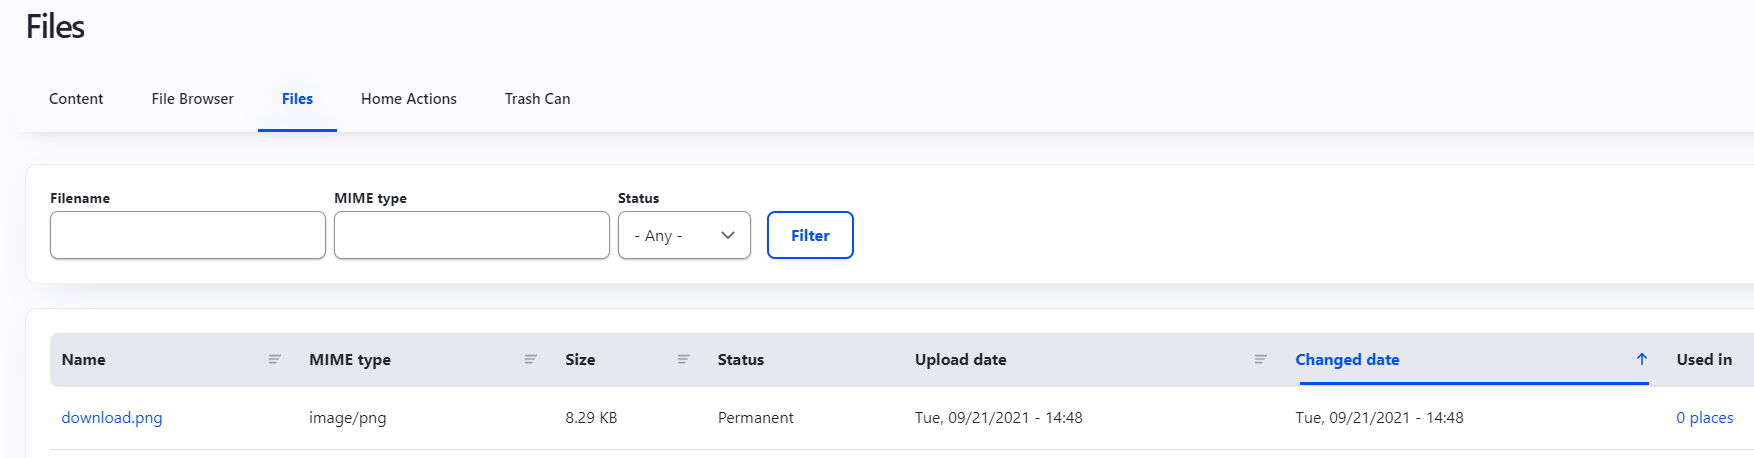
Files
FilesUnder Content > Files you will find a list of the files on your website.
Scheduled Content
Scheduled Contentinfo on "Scheduled" option in the Content drop down
Editoria11y Website Accessibility Checker
Editoria11y Website Accessibility CheckerEditoria11y is a website accessibility tool that helps content editors identify and fix accessibility issues on web pages. It runs in real time as you edit the site content.
The tool displays alerts with explanations of each issue and guidance on how to resolve it. Some alerts highlight potential issues that require manual review. If, upon review, the issue does not pose an actual accessibility barrier, no action is needed.
How to Use
To use Editoria11y, make sure you're logged in to your site with editor permissions. Once logged in, navigate to any page on the site. In the lower right corner, you’ll see a round icon — click it to turn accessibility alerts on or off.
- A blue icon means no accessibility issues were detected.
- If issues are present, yellow or red icons will appear next to affected content:
- Yellow = Possible issue that needs review
- Red = Confirmed accessibility issue
To learn more about a specific issue, hover your mouse over the alert icon. A tooltip will appear explaining the problem and how to fix it.
Headings and Alt Text
Click the checklist button next to the round icon to access two helpful features:
- Headings: Displays the heading structure of the page (ignore headings from the site header if shown).
- Alt Text: Lists all images on the page along with their alternative text.
Hiding Alerts
You can hide all accessibility alerts at any time by clicking the round icon in the corner again. Click once more to show the alerts again.
Notifications
NotificationsYour website can have email and text notifications feature enabled. By default, the notifications can be sent from the News and Site Alert content types. Additional content types can have notifications added if desired.
The email and text notifications can be sent when news or site alerts are added to the website or from the existing news and site alerts content. Email and text notifications can be sent at the same time or separately.
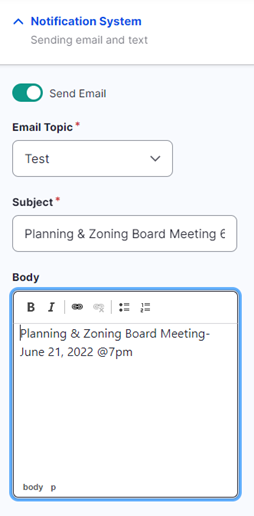
Sending Email Notifications
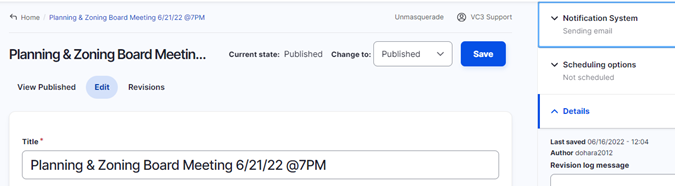
Sending Email NotificationsTo send email notifications start creating news or site alert content or find existing news or site alert you would like to send a notification from.
While on the content edit page, find the notification section that is located on the right-hand side of the page called Notification System:
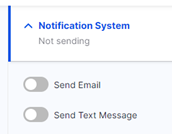
Expand the Notification System section and select notification or notifications you would like to send. The options are Send Email and Send Text Message.
For this example, we select Send Email to send an email notification:

Once the Send Email is selected, additional options are displayed:
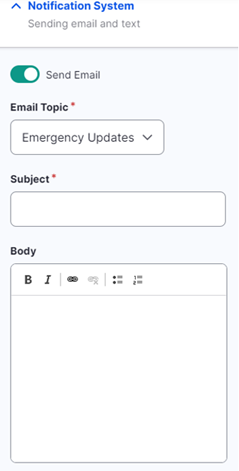
- Email Topic – The drop-down field selection is required. Choose the topic you would like to send the notification for. Subscribers that are subscribed to this topic will receive email notification.
- Subject – The field is required. Enter the subject of the email notification. The subject will be displayed in the email subject line of the notification.
- Body – The field is automatically populated from the news or the site alert body field when it’s filled out. The notification Body field can be manually added or updated as well.
The following screenshot is an example of the completed email notification before it’s sent:
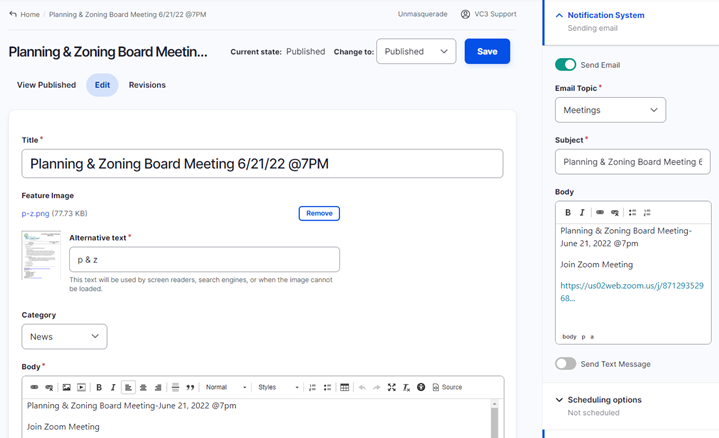
The information displayed under the Send Email section will be sent in the email notification.
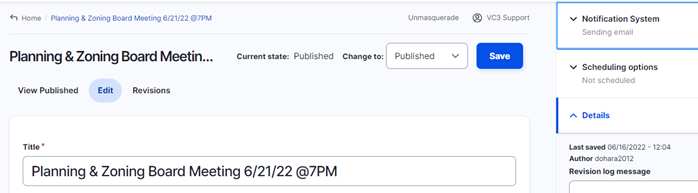
To send email notification make sure the content state is set to Published. Only published content notifications will be send out. The content state option is located on the top right of the screen next to the Save button.

To save the page content and send the email notification click on the Save button at the top right.
After the content is saved the website page will display information about the notification:

To view the email notifications that were sent out navigate to Content -> Notifications -> Email. The Email Notifications page will display the sent or pending email notifications:
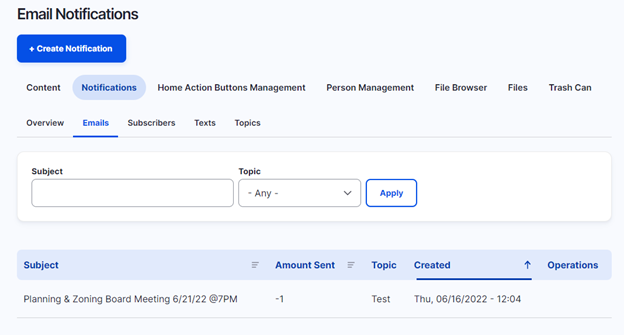
The email notifications can be filtered by the email subject and the notification topic.
Sending Text Notifications
Sending Text NotificationsTo send text notifications start creating news or site alert content or find existing news or site alert you would like to send a text notification from.
While on the content edit page, find the notification section that is located on the right-hand side of the page called Notification System:
Select Send Text Message check box to send a text notification.
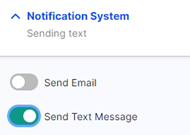
Once the Send Text Messages option is selected, additional options are displayed under the Notification System section.
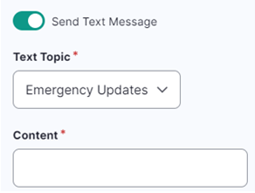
- Text Topic – The drop-down field selection is required. Choose the topic you would like to send the notification for. Subscribers that are subscribed to this topic will receive text notification.
- Content – The field is required. Enter a brief message for the text notification. This field content is sent in the text notification.
Note that the text message notification will also include a link to the page from where the notification is sent from.
The following is an example of the screen of the filled out text notification:
To send text message notification make sure the content state is set to Published. Only published content notifications will be send out. The content state option is located on the top right of the screen next to the Save button.
To save the page content and send the text message notification, click on the Save button at the top right.
After the content is saved the website page will display information about the prepared notification:

To view the text notifications that were sent out or pending notifications, navigate to Content -> Notifications -> Texts. The Text Notifications page will display the sent or prepared for sending text notifications:
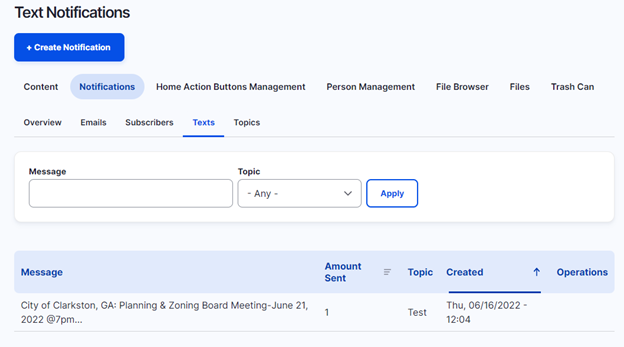
The text notifications can be filtered by the message text and the notification topic.
Viewing and Updating the List of Subscribers
Viewing and Updating the List of SubscribersTo view the list of subscribers, navigate to Content -> Notifications -> Subscribers. The list displays the following fields:
- Email address – email address of the subscriber
- Phone number – phone number of the subscriber
- Validated - Identified if the subscriber confirmed the subscription
- Last Updated – Date when the subscription was last updated
The Notification Subscribers page allows operations like edit, validate, or invalidate the subscription. Each field except for Operations can be sorted in ascending or descending order.
After subscribers sign up for notifications they receive a confirmation email to confirm the subscription. After the subscription is confirmed, the page will display Yes in the Validated field column. Those subscribers that don’t have their email validated will have displayed No in the Validated column.
If the subscription is not validated, the website administrators can resent the verification email to the subscriber. To do it, choose the subscriber you want send the validation email for, click on the arrow on the Edit button, and click on the Send Verification Email link.
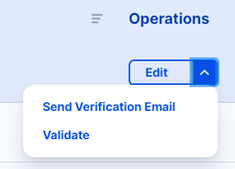
Validating the subscriptions manually by clicking on the Validate link on the Edit button is not recommended.
Viewing and Updating the List of Notification Topics
Viewing and Updating the List of Notification TopicsTo view the list of notification topics, navigate to Content -> Notifications -> Topics.
The page displays the list of topics that can be filtered by entering values into the Label field and clicking on the Apply button. The topics can be sorted by clicking on the Label column name.
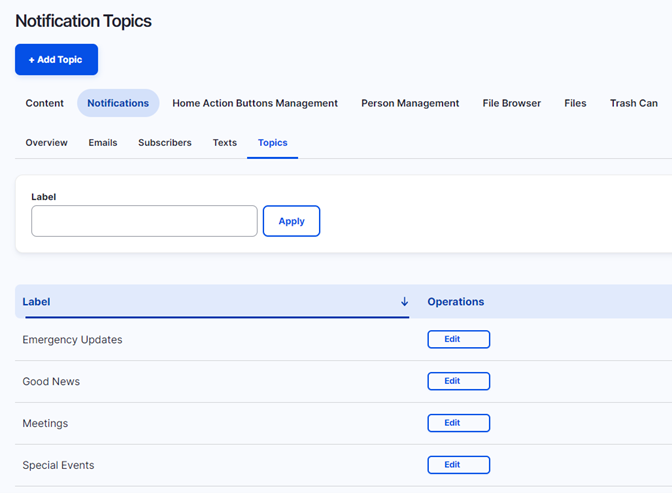
To add a new notification topic, click on the Add Topic button on the top portion of the page. From the Add Notification Topic page enter the new topic name and click on the Save button.
To change an existing topic name, click on the Edit button for the notification you want to change, change the topic name, and click on the Save button.
Real Time Reports
Real Time ReportsReal Time Reports are available to you at any time through your website. To access them you must be logged in to your site, then you can find them in the top Navigation. These reports show you items that could be affecting your site's health or ADA Compliance.
Alt Tags
Alt Tags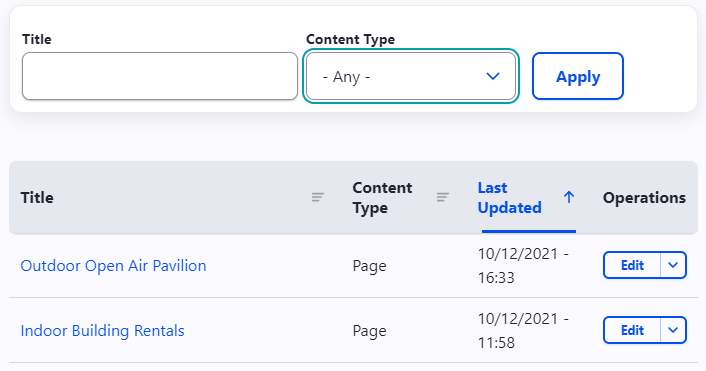 You can access your Alt Tags report under Real Time Reports > Alt Tags
This page shows you a filterable/sortable table of any instances in the website where images are missing Alt Tags.
Fix your alt tags by:
- Select the "title" on the Alt Tag report page
- this will send you to the page where you are missing the Alt Tag
- Navigate to the image that is missing the Alt Tag
- Select Edit to edit the page
- Select the image then the image icon in the text editor bar, or double click the image
- Add your Alt Text and Save
- Don't forget to save the page!
What Are Alt Tags?
Alt Tags ("alt text", "alt description", or "alternative text") are snippets of HTML code that is used for the following:
- Visually impaired users relying on screen readers will read an alt tag to describe an image.
- The alt text displays in the event the image cannot load.
- Search engine crawlers also rely on alt text to improve the image's indexing.
Ensuring all images have some descriptive alt text is the best way to keep your website accessible.
Blank Pages
Blank PagesPages that are considered blank may annoy the user and hinder your search engine rankings.
Access the Blank Page Report by navigating to Real Time Reports > Blank Pages
This page shows you a filterable/sortable table of any instances in the website where pages are considered blank.
You can fix blank pages in a few different ways, depending on what you need:
- Delete the blank page if you do not need it
- Add Content to the page and save if you'd like it to be live
- Unpublish the page if you'd like to use it late for content
Broken Links
Broken LinksHaving links that send a user to a 404 Not Found or unreachable site hinders the credibility of your website.
You can access your Broken Links report under Real Time Reports > Broken Links
This page shows you a filterable/sortable table of any instances in the website where there is a Broken Link.
Fix Broken Links by:
- Select the "Title" on the Broken Links report page
- this will send you to the page with the broken link
- Select Edit to edit the page
- Navigate to the broken link and select the link then the link icon in the text editor bar, or double click the link
- Type or paste in the correct link and save
- Don't forget to save the page!
Click Here Report
Click Here ReportHaving links state "click here", "read more", or "visit website" is not only considered bad practice; it gives no concrete description of what information is behind the link.
Ensuring that links have a detailed and concise phrase improves SEO and usability.
You can access your Click Here report under Real Time Reports > Click Here
This page shows you a filterable/sortable table of any instances in the website where there is a "click here" link.
Fix "Click Here" Links by:
- Select the "Title" on the Click Here report page
- this will send you to the page with the "click here" link
- Select Edit to edit the page
- Navigate to the click here link and edit the text displaying the link
- Tip: try to make the link text text say what the link actually is
- Example: instead of, "Click here to watch our webinar." try, "Watch our webinar."
- Tip: try to make the link text text say what the link actually is
- Verify that the link is still correct and working
- Don't forget to save the page!
Limited Pages
Limited PagesLimited Pages Report info
No Menu Content Report
No Menu Content Report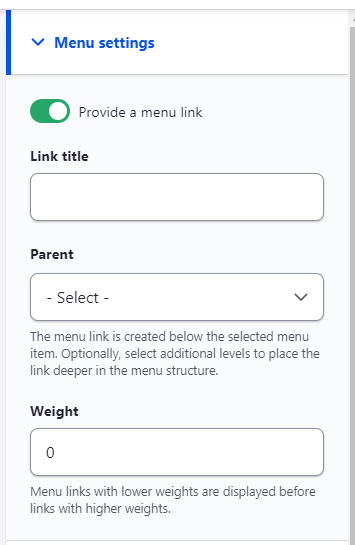 Pages that can be placed in the menu but are not within will confuse users who arrive to the page from other sources (search engines, third-party websites, etc).
Consider placing the page within the menu or archiving it.
You can access your No Menu Content report under Real Time Reports > No Menu Content
This page shows you a filterable/sortable table of any instances in the website where there is a page not in the menu.
Fix No Menu Content pages by:
- Select the "Title" on the No Menu Content report page
- this will send you to the page that is not in the menu
- Select Edit to edit the page
- On the Right side of the page you can edit the Menu settings to make sure your page is in the menu
- Make sure "Provide a menu link" is selected
- Select the parent page from the Parent drop down
- Don't forget to save the page!
Orphaned Files
Orphaned FilesAny file that is located on the server but not utilized within content is considered orphaned. Orphaned files may contain outdated data, which can still be picked up by search engines. Consider deleting the file if its no longer relevant to keep.
After a short time period (by default, a week) any orphaned files will be automatically deleted based off the "Discovered as Orphan" column.
Stale Pages
Stale PagesEnsuring pages have been updated recently improves the credibility of your site and authenticity of the content placed on the page. If the content is no longer relevant or necessary, consider archiving the page.
To access your Stale Pages Report navigate to Real Time Reports >Stale Pages.
This page shows you a filterable/sortable table of any instances in the website where there is a stale page.
Fix Stale Pages by:
- Select the "Title" on the Stale Pages report page
- this will send you to the Stale Page
- Select Edit to edit the page
- From here you can:
- Unpublish the page
- Archive the page
- Edit the page
- Don't forget to save the page when you are finished!
Structure
StructureUnder the Structure tab you have direct access to make modifications to the main menu and to manage your site taxonomy (categories, Councils, Committees, etc.)